I’ve liked bikes and bike culture for quite some time. In recent years I’ve traded going fast on the bike for going comfortably—whether that’s personal growth or just my joints negotiating terms. Regardless the reason, there are few things I enjoy more than riding my bike, whether I’m winding along scenic routes in NJ and PA, roaming around town, or commuting to the office.
Beyond just general cycling, a few years ago I discovered I like weird bikes. I mean really weird ones, known as recumbent bikes (or ‘bents). These contraptions allow you to remain in a laid back position while you pedal. They hold many advantages (and certainly some disadvantages too) over “regular” bikes. Unfortunately the heyday of recumbents has passed*, but I do believe there’s still a valuable place for them in the cycling community.
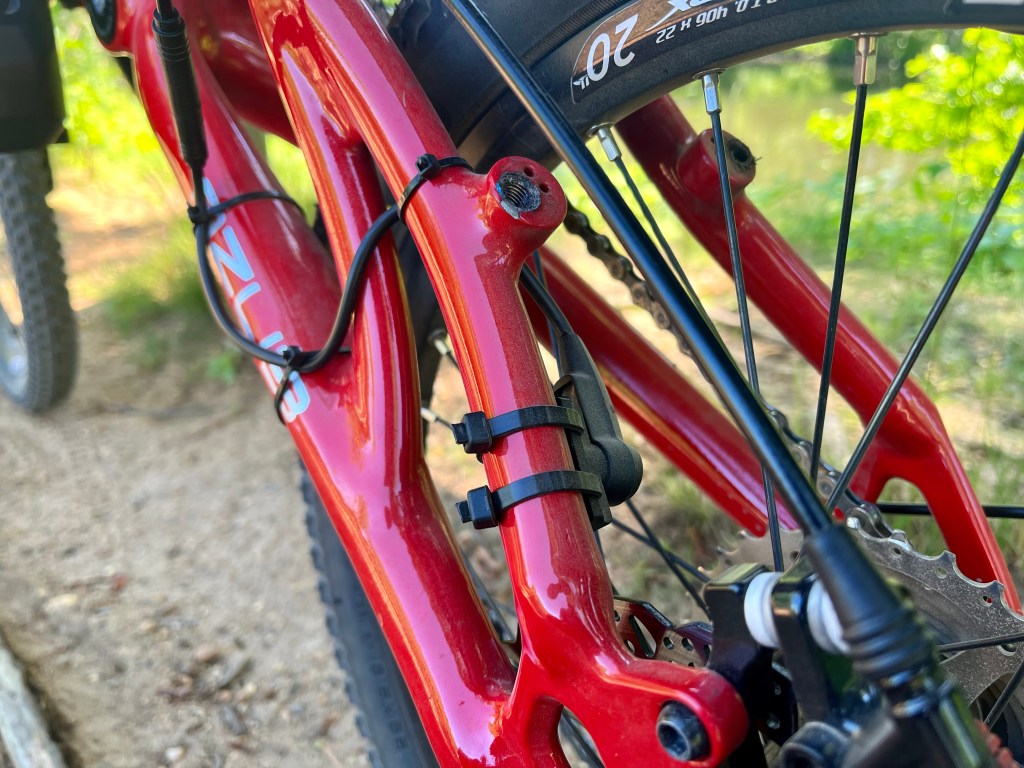
I said they were weird didn’t I? This is my first recumbent bike purchased in 2017. I’ll be writing more about this particular bike (Azub MINI) and others later.
Welcome to thelaidbackcyclist.blog, my name is Mark. With a background in neuroscience, I’ve always been drawn to how things work—brains included, bikes included. I’m an enthusiast rather than an expert, but I hope there’s something here worth your time, and perhaps even the start of a future ‘bent rider’s journey.
.
*I should be more specific: The 2-wheeled recumbent bike has been steadily declining in popularity. The 3-wheeled recumbent trike, on the other hand, is quite popular nowadays (relatively speaking).
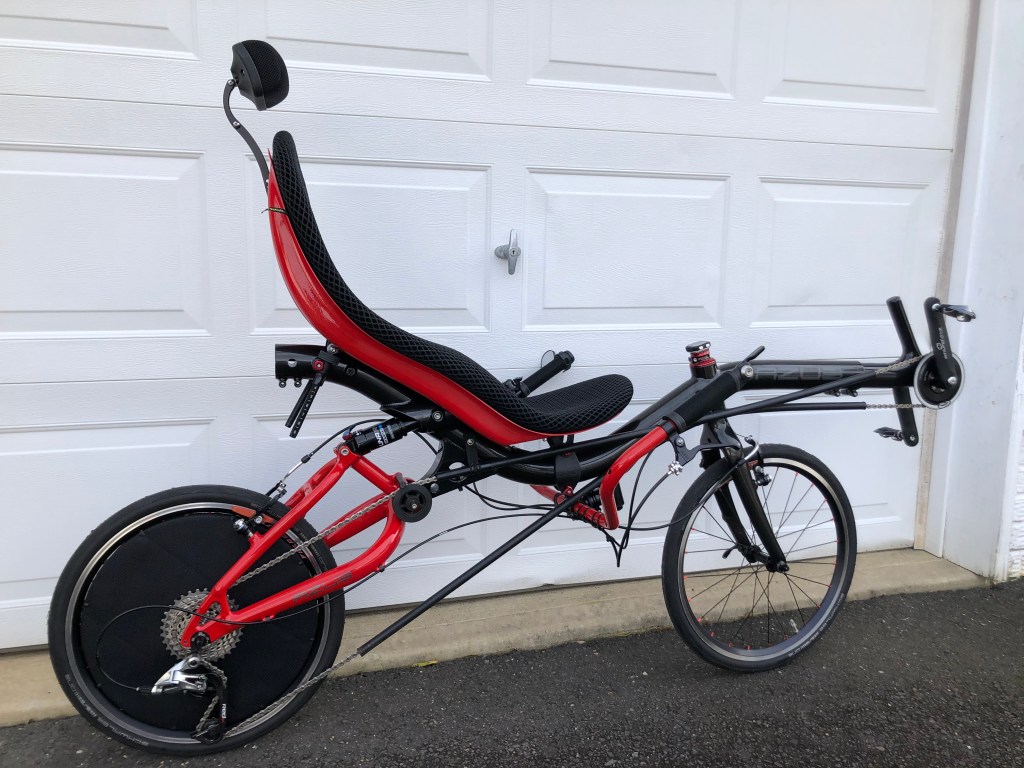
In the late 90s/early 00s, one of the hottest racing recumbents was the Rotator Pursuit. Built by Steve Delaire in Santa Rosa CA, the Pursuit was THE recumbent low-racer before that bike category even existed in the USA. Unlike most low-racers, the Pursuit seats you in a low position relative to the ground, and yet keeps your back upright for a better view of the road. Pursuits are also infamously known for their overly sensitive handling (aka “killer tiller”). A couple of years ago, I was fortunate enough to get my hands on this piece of recumbent history thanks to Recycled Recumbents. I’ve since sold the bike but finally found some time this weekend to write this brief review.
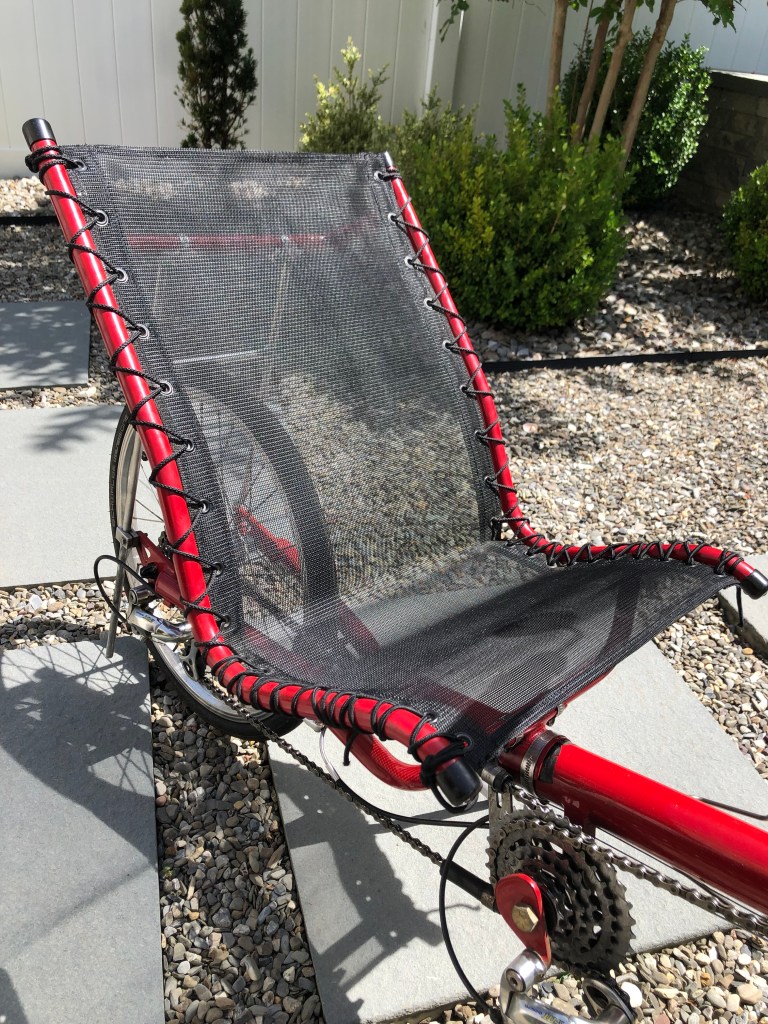
There are several versions of the Pursuit with differences in wheel size and frame material. My particular Pursuit is a dual-20” steel frame model in red. The long mono-tube frame design gives the bike a streamlined look and an inherent suspension. From end to end, the bike is 83” long with a 63” wheelbase and weighs around 30 lbs. The bike arrived equipped as it would have been two decades ago with Shimano 105 derailleurs and v-brakes, Weinman 4019 wheels with Shimano LX hubs and Schwalbe 28 mm tires.
The Pursuit’s upright seat uses a unique combination of materials to provide both support and comfort. The 6-speed mid-drive is visible below the seat.
The Pursuit’s seat is one of several unique aspects of this bike. It is made of a mesh fabric connected to a steel frame with rigid paracord along the back. That part is fairly standard. However, the base of the seat is laced in with stretchy 3/16” shock cord, and the result is incredible. The seat is firm on the lower back where you push from and acts as a soft shock absorber under your rear. Hose clamps secure the bottom of the seat to the bike frame. That’s something you don’t see every day. The clamps work fine, but you’ll need a flathead screwdriver to adjust the seat position. The rear seat stays are clamped in place with small bolts that require a wrench to adjust. The seat is meant to be upright, so the recline angle adjustment is fairly limited.
My favorite feature of this bike is the drivetrain. To give the small 20” wheels a wide gear range, there is a second mid-drive cassette instead of a front derailleur. The rear cassette is an 11-30 Shimano 105 8-speed controlled by a right-handed twist shifter, while the mid-drive is a 12-34 6-speed connected to a rear twist shifter that is mounted upside down on the left side of the handlebar. This combination gives the rider a total of 48 gears to choose from with an impressive range of 20 to 150 gear inches. That many gears may seem intimidating at first, but if you just imagine the bike with a typical front derailleur system using 6 instead of 2-3 chainrings, you adapt to it quickly.
One cannot discuss the Pursuit without mentioning the steering and “killer tiller”. The original fork geometry gave the bike a reputation for quirky handling that scared away customers. Around 2000, Steve made some changes to the fork to improve things. I’m not certain, but I suspect the unit I have uses this improved fork. That being said, this bike does not handle well when moving up an incline at less than 10 mph. I found myself fighting to keep the bike upright when riding up steep hills.
The Pursuit shines when on flat, smooth asphalt. It is extremely stable and fun to ride at high speeds, and you can even equip it with a fairing to reduce your drag. While Steve ended Rotator in 2008, you can still find his bikes for sale every once in a while. The lightweight titanium version of the Rotator is a true unicorn worth grabbing if you come across one. As for me, I had to let go of this bike after a short period. My rides tend to be too hilly for the bike, and my lower back didn’t appreciate the upright seating position. Despite our brief time together, I feel fortunate to have experienced this classic ‘bent first hand.
To hear a bit more about recumbent bike history as told by Rotator’s Steve Delaire, take a look at this short video.
Today’s review will focus on a different kind of bike: the stand-up bike or SUB. Once again I’m drawn to an unusual looking bicycle, but this one won’t draw quite as much attention as a recumbent. Unlike recumbent bikes that have you reclining on a large seat as you pedal, SUBs are essentially bikes without seats, making you stand upright. You may be surprised that I’m reviewing a bike that is so opposite to a recumbent, but what I’ve recently learned these past few months is that SUBs offer many similar health benefits as recumbents.
These bikes fit nicely in the space between running and cycling. By providing the upright position of a runner, there is less strain on the back, shoulders, and arms compared to being hunched over on a typical diamond-framed bike. At the same time, the pedaling motion is free of impact forces on the lower joints. So runners can enjoy the feeling of running without the hard impacts, and cyclists can enjoy riding without saddle soreness or any of the other aches commonly associated with regular bikes.
There are only a handful of SUB manufacturers. The most popular probably being ElliptiGO, followed by a few others: Cyclete,StreetStrider, HalfBike, and MeMover. SUBs can be distinguished mainly by their style of pedaling which includes a typical circular motion, a long-stride elliptical motion, a teardrop-shaped motion, or even a stepping motion.
The ElliptiGO SUB
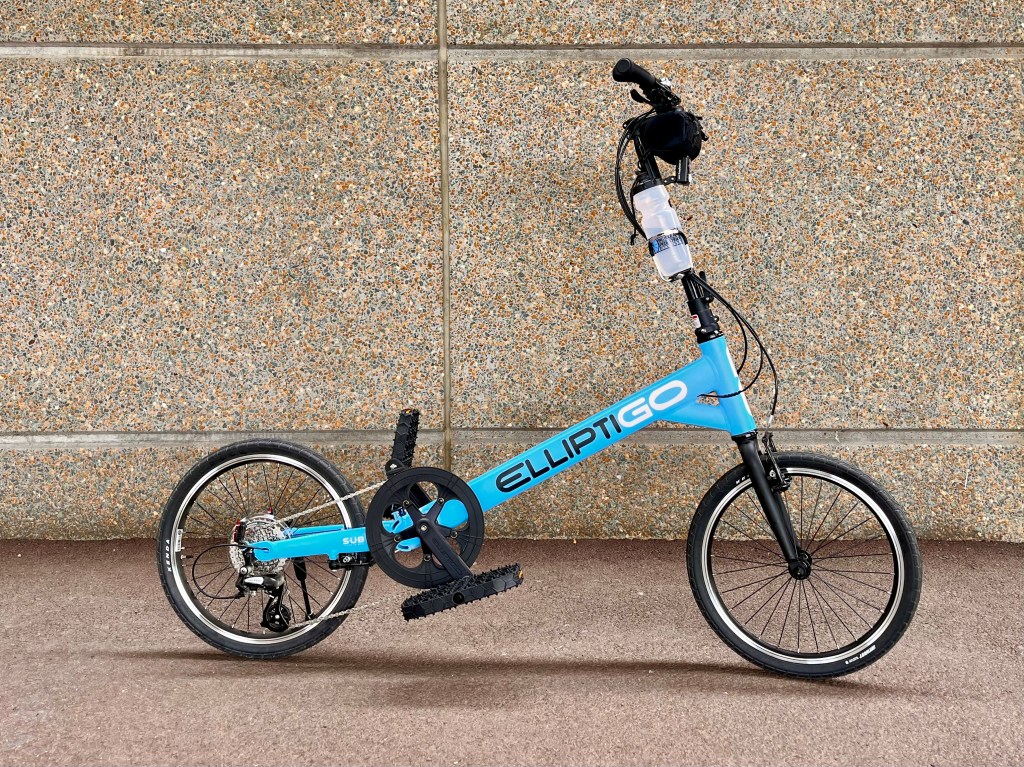
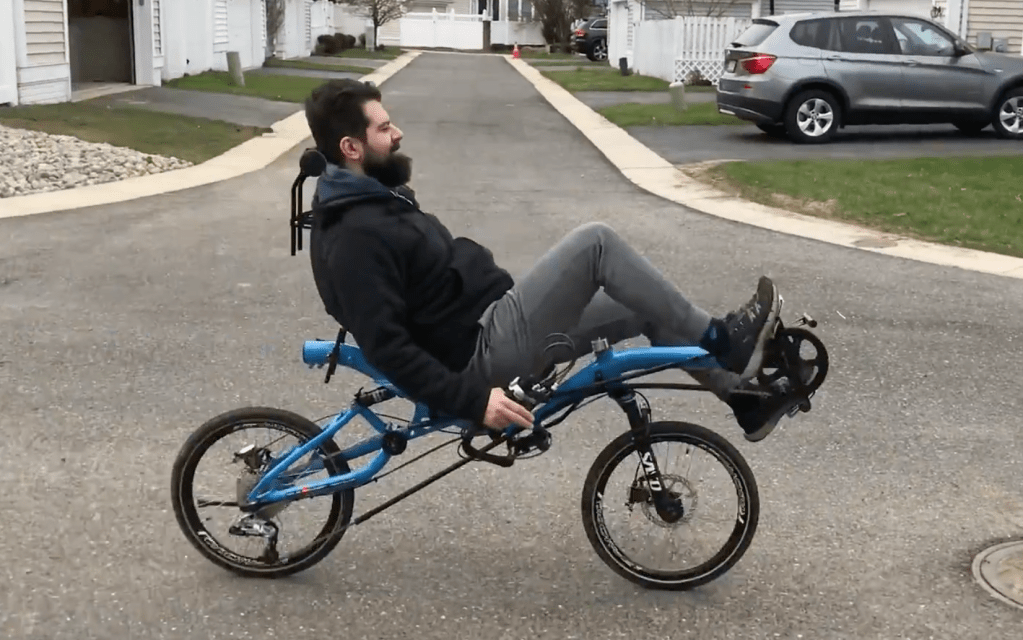
Last September I had the opportunity to test ride two ElliptiGO standing bikes: the “3C” elliptical pedaling bike and the “SUB” circular pedaling bike. The elliptical bike was unique, but I found it large, heavy, and awkward to pedal. Plus I couldn’t justify the 3C’s steep price tag when the ElliptiGO SUB was a fraction of the cost and offered similar benefits. In the end, I bought a floor model matte blue ElliptiGO SUB at a local fitness shop.
The ElliptiGO SUB has an aluminum frame and rigid steel fork. The drivetrain is a trigger-shifting 8-speed Shimano Altus rear derailleur (11-34 cassette) and 60T chainring (309%). It has 20” aluminum wheels with 1.5” Kenda Kwest tires and Shimano rim brakes. The pedals are oversized platform pedals designed to support your entire foot. The steering column is height adjustable with indexed locking. The handlebars are a medium width supplied with ergonomic grips and a kickstand comes standard. Taken together, I think these specs make an attractive package that is the lightest and most compact stand-up bike (29 lbs and 66” length).
One thing to note is that the 20” ElliptiGO SUB is no longer in production and instead ElliptiGO now offers more costly, larger wheeled versions of their circular pedaling stand-up bikes (MSUB/RSUB). I would have liked to see them continue to offer the smaller SUB as their lowest tier bike to introduce new riders to the benefits of stand-up bikes.
Fun in the SUB
While I was looking forward to the upright posture and low-impact benefits of the SUB, the sheer fun and convenience of riding it took me by complete surprise. The SUB has relegated my Azub e-MINI recumbent to the back of the garage, becoming my daily commuter for the past 4 months. This bike works well for short, brisk rides to work and around town. Unlike a recumbent bike, the SUB is very easy to hop on and off, navigate tight turns, and maneuver around obstacles. The additional 12” of height you gain on the SUB gives you a great view of the road ahead and makes you easily visible to others. Hills are conquered with relative ease with the help of your standing weight on the pedals, unlike my experience patiently spinning to slowly climb on a recumbent bike.
Elliptigo’s claims about low impact are not exaggerated, and standing the entire time makes for an intense cardio session. For someone with chronic low back issues, the upright position combined with the pedaling motion doesn’t bother my back. Being able to rock side-to-side while pedaling adds a welcome upper-body component to the workout as well.
Limitations
Despite these benefits, the SUB does have its shortcomings. Without a seat, you likely won’t want to ride this on day-long tours. There are individuals out there doing century rides on stand-up bikes, but not this non-athlete.
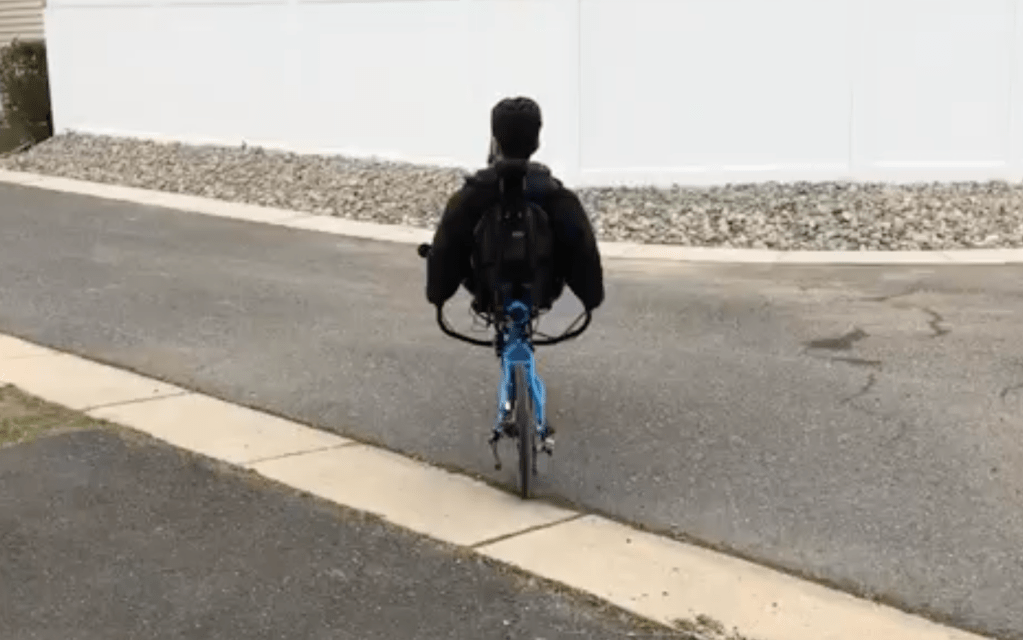
Another reason these stand-up bikes make for poor touring bikes is there’s no place for a rear rack to carry panniers or trunk bags. When riding the SUB, it will just be you and what you can carry on your body such as a backpack. To transport a small amount of stuff, you could add a handlebar bag, but you’ll never get the capacity of full-sized rear panniers. I added a small Burrito handlebar bag to stash my keys and phone. Ideally, I’d like to see ElliptiGO engineer a front rack system to support a large basket or bag and front panniers to give commuters a bit more cargo space. This would expand the versatility of these bikes from just pure fitness machines to something more utilitarian.
I was surprised by the lack of bottle cage bosses on the frame, which meant buying a Topeak cage mount to attach to the steering column. I also would have liked to see mounts for full-length fenders. Unfortunately, ElliptiGO only offers a full fender set for their RSUB model and just a partial rear fender for the SUB.
Final remarks
I’ve been espousing the benefits of recumbent bicycles for so long that I never imagined enjoying such a different kind of bicycle this much. If you’re a current or former runner or a cyclist who wants to ride without the discomfort of a regular bike, then the ElliptiGO SUB (or any other stand-up bike) is worth trying. However, if you need a bike for running errands, commuting, or going on long tours, you may find yourself limited by the SUB’s lack of cargo-carrying capacity.
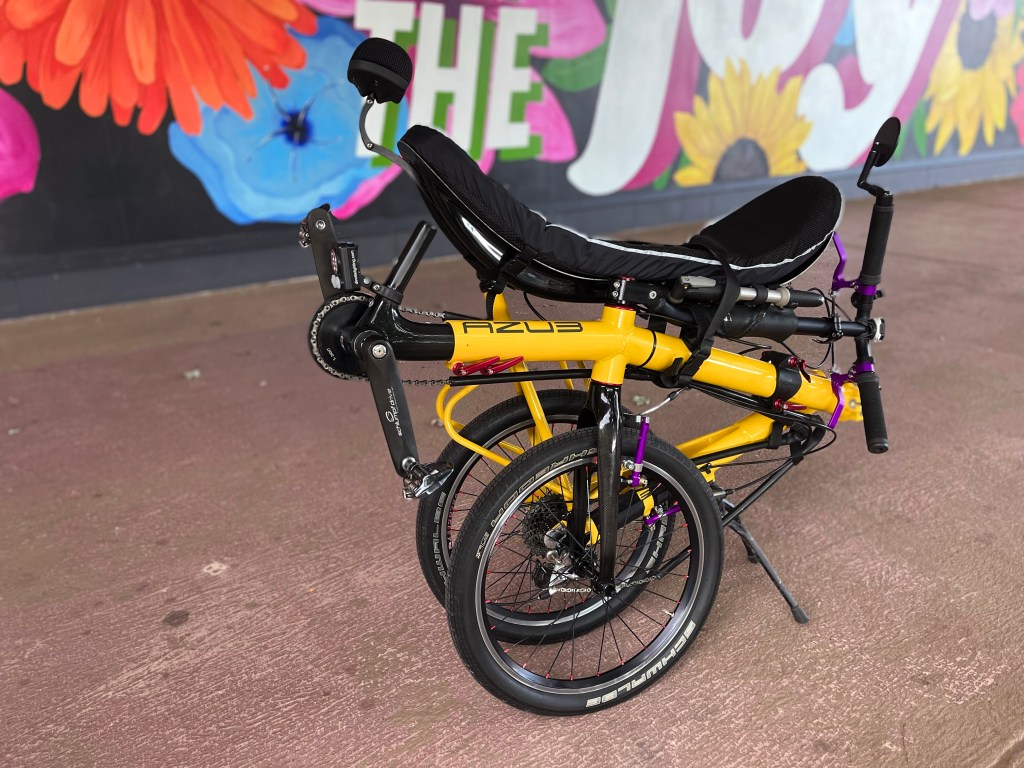
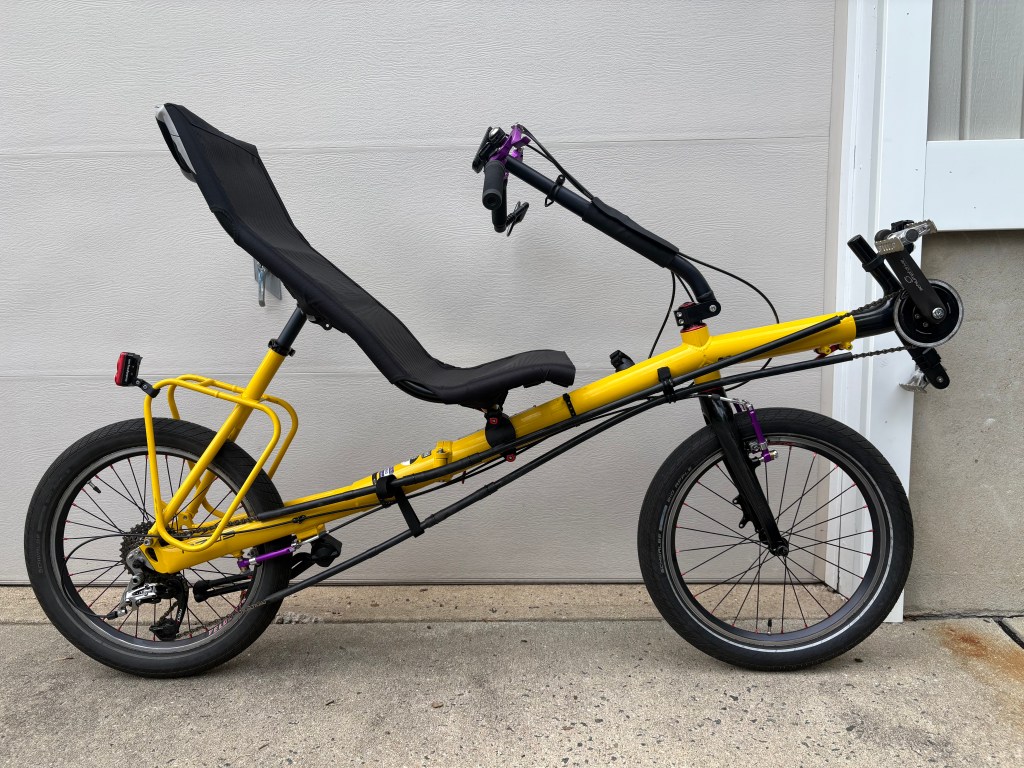
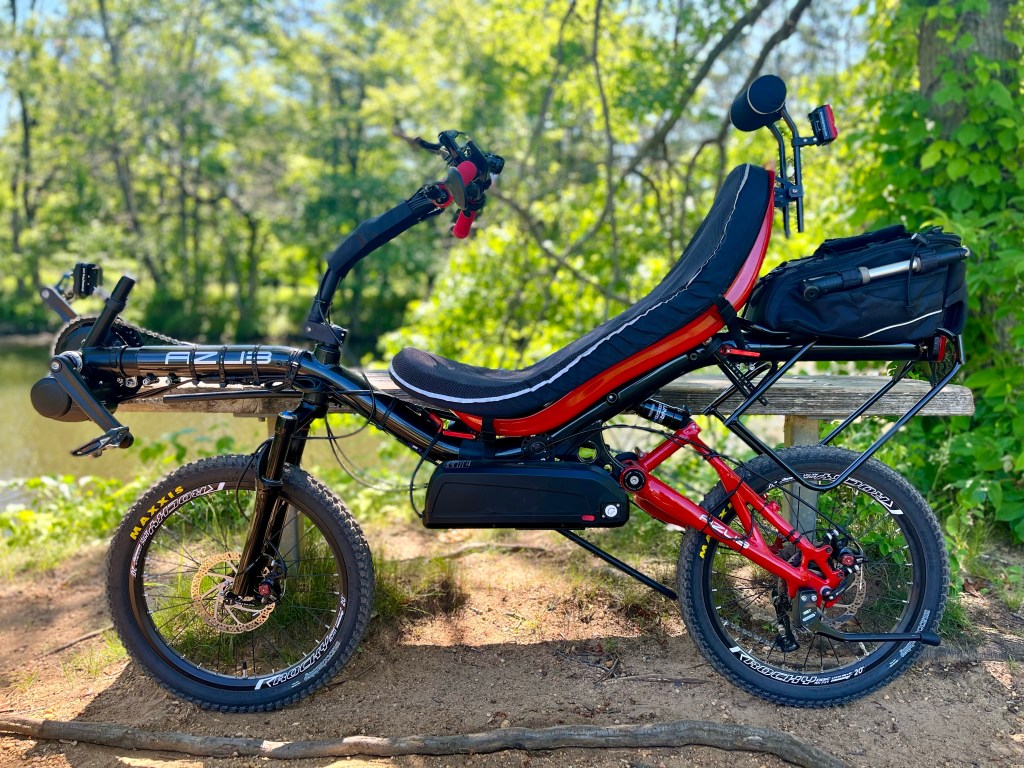
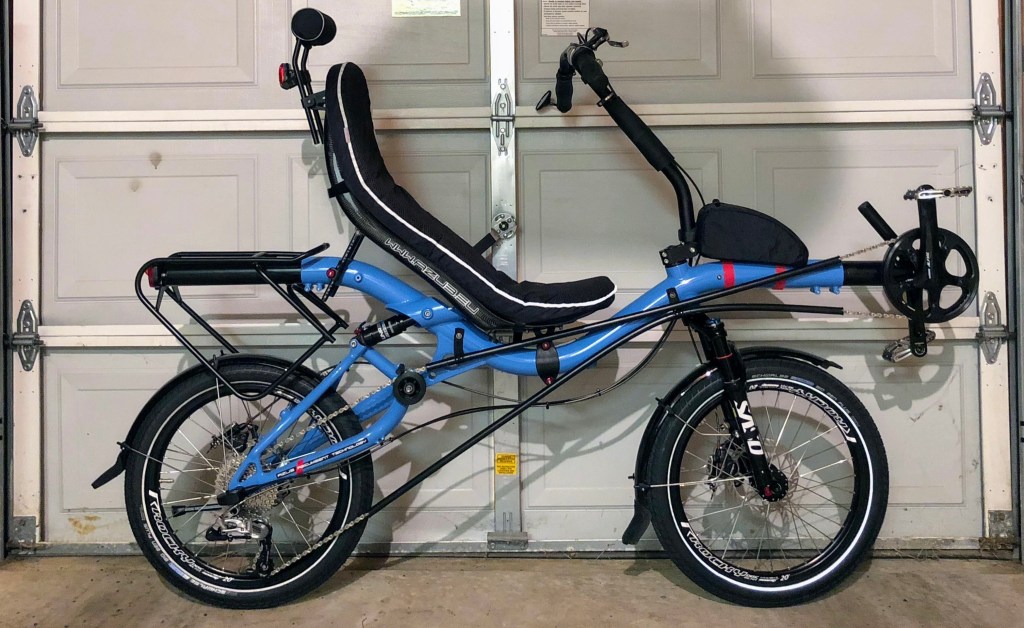
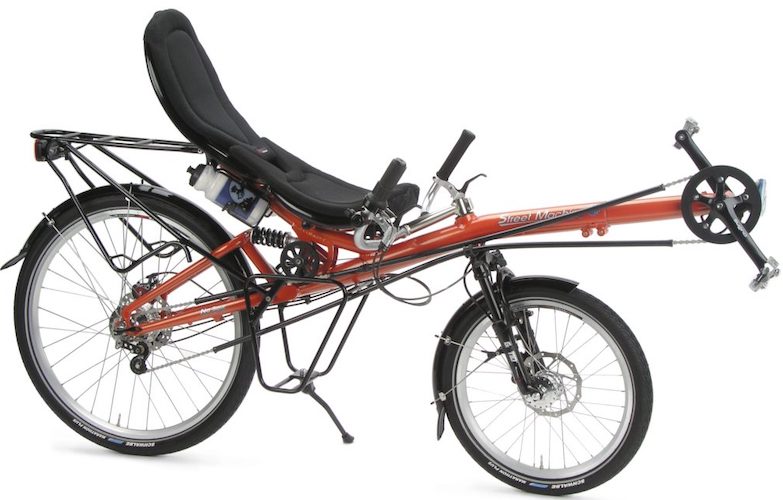
Since I began riding recumbents, I’ve often dreamt of traveling with one in a suitcase and unfolding it in some remote destination to tour the countryside. While the pandemic put the brakes on traveling for some time, it did allow me to search for my ideal folding recumbent. In the end, I decided to get another Azub: the Origami. Initially, I planned to replace my Azub MINI with the Origami, but the MINI has since transformed into my cushy electric pedal assist bike that I just can’t bear to let go of yet.
The build
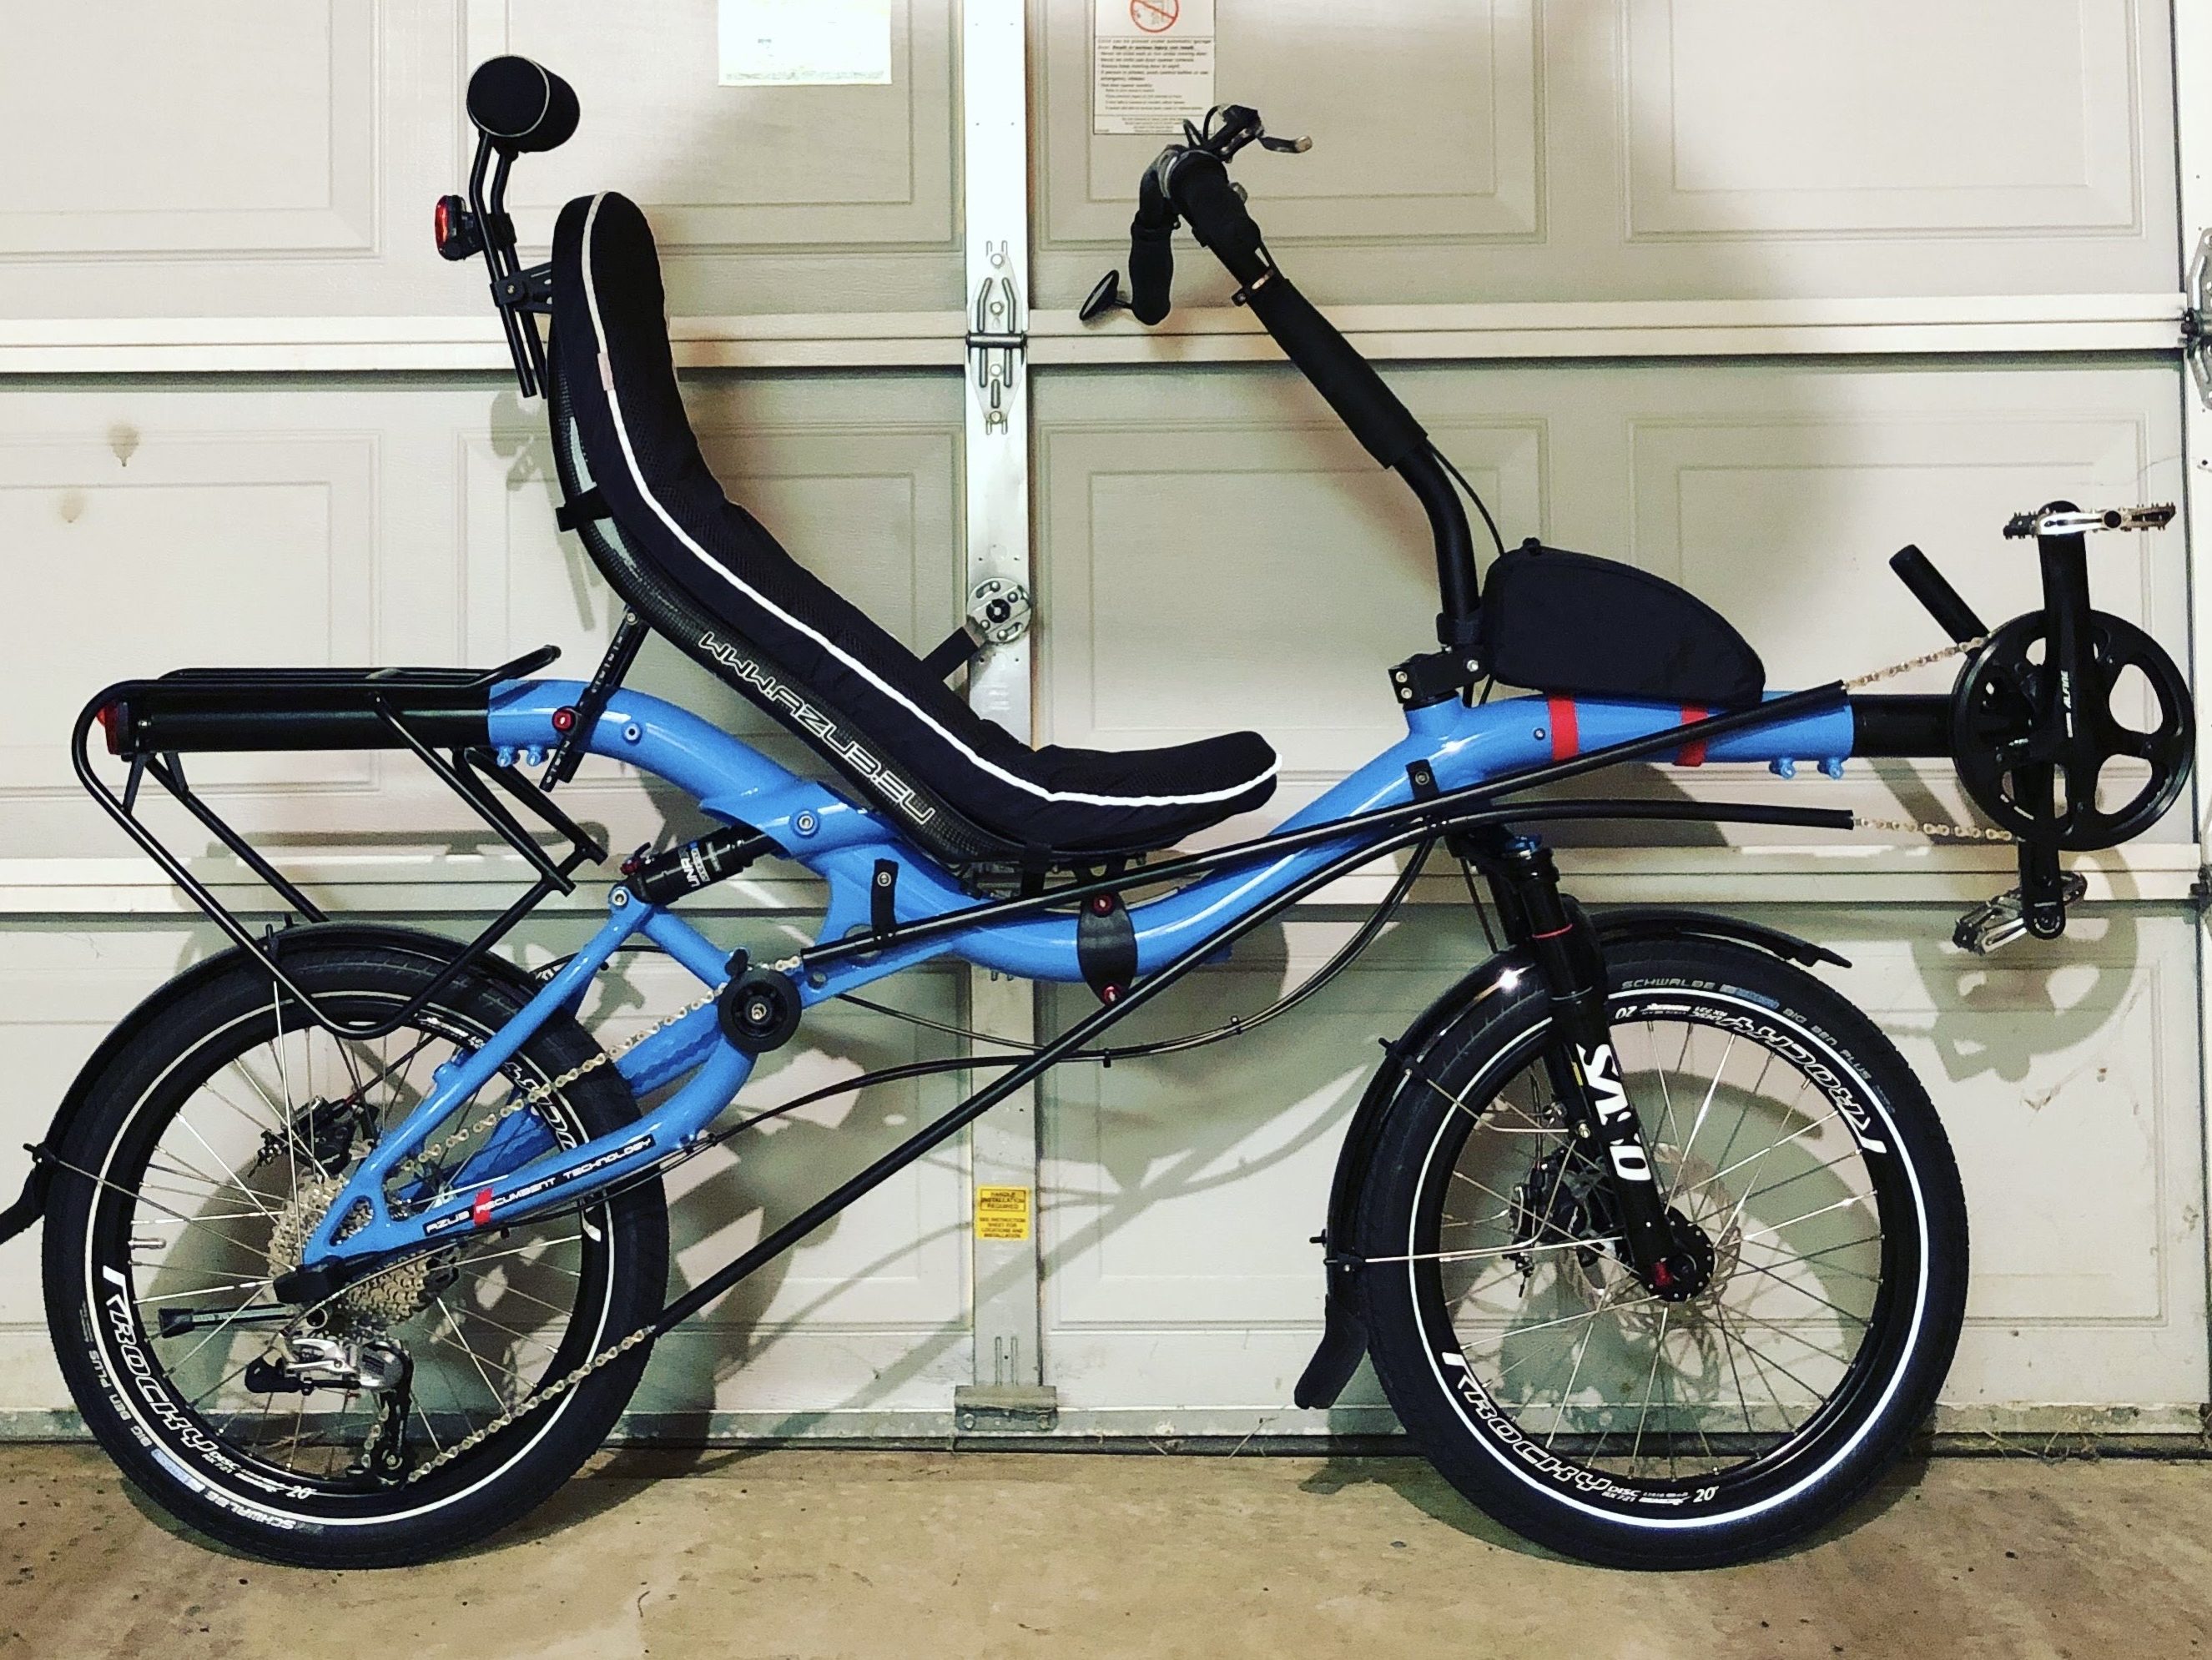
The Origami is a short wheelbase (SWB), dual 20″ aluminum frame recumbent with over-seat steering (OSS). The frame is a streamlined monotube design that looks fast even at rest. The rear of the frame has a creatively integrated pannier rack that rotates out of the way when folding the bike. The frame lines allowed Azub to set up a simple chain line with just a couple long chain tubes and no idlers.
I ordered the Origami in the spring of 2021 with basic options (Sora 3×9, BB7 brakes) except for a carbon fiber seat upgrade. As usual, Azub offers a wide array of customization via their online configurator. Having recently converted my MINI to electric, I had a bunch of nice parts for the Origami. While the stock weight of the bike was probably around 40 lbs (still below most airline weight limits), my final build came to ~30lbs in the end— making it a fairly light travel bike as far as folding recumbents go.
Just another Azub?
At first glance, the Origami may look like a slightly (13 cm) longer Azub MINI, but there are some key differences. Namely, the Origami lacks suspension and does not accommodate under-seat steering (USS). Of course, in exchange for losing those features, the Origami gains one biggie: it folds (more on folding below).
The Origami also allows for a more reclined /aerodynamic position compared to Azub’s other bikes, and the position of the bottom bracket is slightly higher to deliver more power. Another difference is the more narrow handlebars on the Origami, presumably to help keep the bike compact when folded. It’s a minor detail, but it will limit your cockpit space for accessories more than other bikes.
The ride
I found the Origami, with its rigid frame and sporty seat positioning, to be a quick little bike. The small wheels gave it fast acceleration without any suspension sluggishness. The narrow handlebars tucking your arms/elbows in makes you feel like you’re racing. While this isn’t a racing bike, it’ll just get you across town quickly with a smile on your face.
The ride can be a bit unforgiving, and riders will benefit from the natural suspension of wider tires running at low pressure. I replaced the stock 1.5” Marathon Racers with 2.15” Big Apples and test rode on some packed dirt/gravel trails. While the Big Apples made the ride tolerable, I yearned to get back onto the cushy full-suspension MINI to protect my sensitive back from the jolts. That said, unless you have a particularly delicate back, I think most riders will find the Origami to be comfortable both on and off the road (with appropriate tires).
The fold
As you can see in this video by Azub, it takes just a minute to fold or unfold the Origami. Compared to other folding recumbents, I think this is as easy as it gets.
A few noteworthy details that aren’t so apparent in the video:
Azub includes a double-legged kickstand to hold the bike up for you while going through the folding/unfolding process.
They also include clip-on platform pedals you can take off when packing the bike.
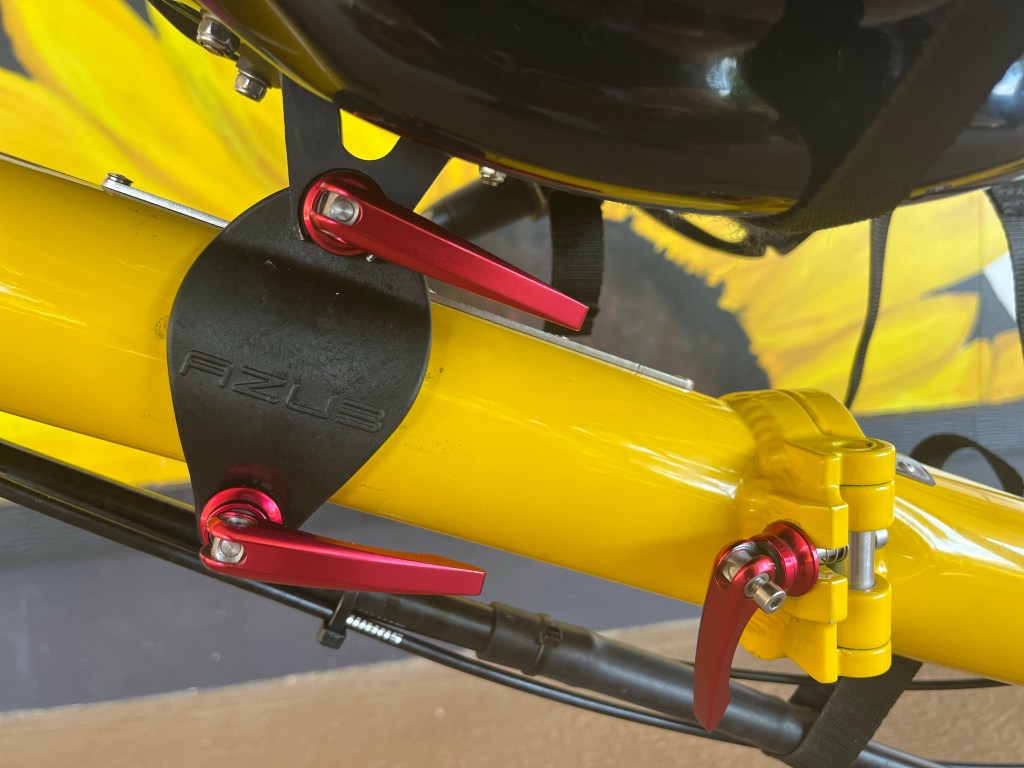
The boom can be easily removed for packing since it is held in place with two quick releases.
Once folded, you can roll the bike by holding the handlebars, or you can place it in a soft carrying bag to sling it over your shoulder. For air travel, you’ll want to put it in a hard-shell suitcase, so note the folded dimensions of the bike down below. I haven’t purchased a suitcase for it yet, but I’ll be sure to write about packing it up when I do.
Folded with seat: 35x35x14 inches (LxHxW)
Folded without seat: 35x30x14 inches (LxHxW)
Other folding recumbents
There are a few other folding recumbents worth considering:
Linear Limo/Roadster– LWB and SWB versions. Rigid frame with 26/20 wheels and OSS or USS steering options. Frame folds into a ski tube, but wheels and seat must be packed separately.
Toxy-ZR– This German company makes several folding recumbents, but the ZR is by far the most exciting. It’s a dual 20” FWD low racer with rear suspension and OSS steering. Definitely on my wish list to try one day.
Trident TWIG– an entry-level 26/20 steel frame bike with OSS steering.
Bike Sat-R-Day– Sadly this folding recumbent is no longer manufactured by the folding bike gurus at Bike Friday, but I couldn’t leave it off the list. It’s a classic with its tiny 16” wheels and compact dimensions.
Lightning P-38 Voyager– Not technically a folder, but this version of the popular P-38 has S&S couplers that allow you to take the frame apart and fit the entire bike in a suit case.
Final remarks
In 2025, I swapped the carbon hardshell seat for an Azub mesh trike seat—a change that transformed both comfort and portability. The mesh suspension was noticeably kinder on long rides, but the real revelation came when packing: I could now pack the entire bike, seat included, into a single Tern Airporter Slim suitcase.
If I were building this bike from scratch today, I’d make a few additional refinements. First, I’d simplify the drivetrain with a front-mounted Pinion p1.18 18-speed gearbox and a single rear cog. This setup would eliminate the fragile rear derailleur while still providing a decent gear range. For improved packability, I’d also specify a separable hinge rather than a folding one, allowing the frame to break cleanly in half. Finally, DaVinci Cable Splitters would streamline cable management during disassembly. Check back here for some updates in spring 2026 when I upgrade to the Pinion setup!
The Origami, with its rigid frame and aerodynamic seating position, is a sportier, livelier bike compared to the MINI. You won’t win any races in the Origami, but you’ll have a trustworthy companion for all your worldly travels.
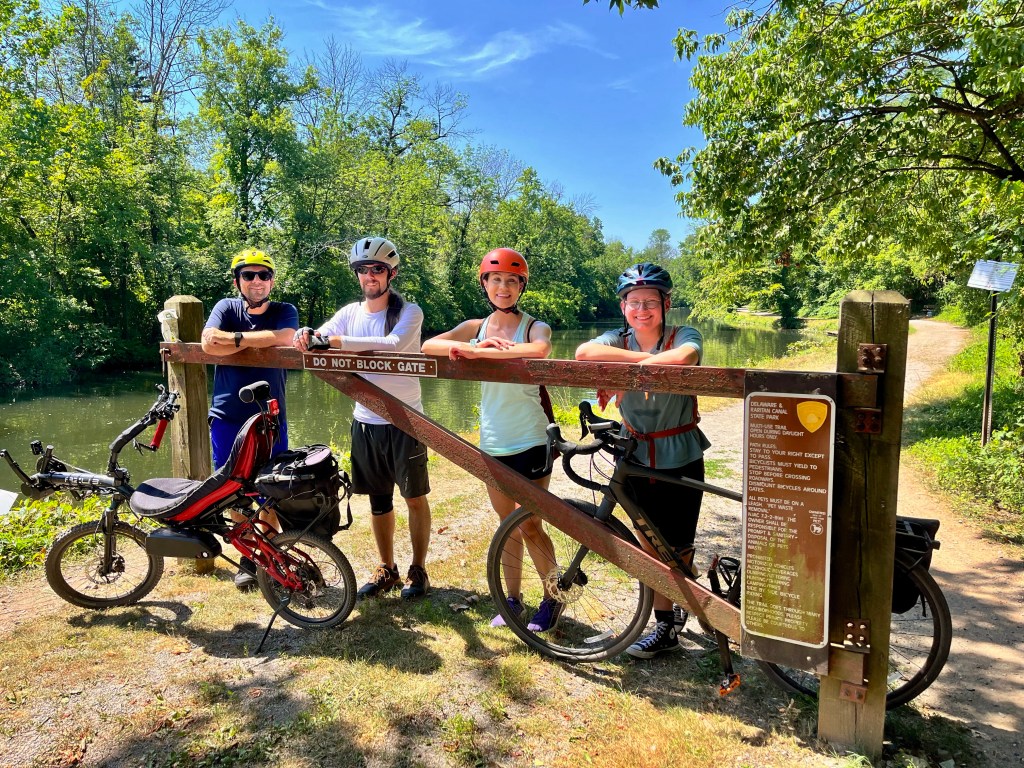
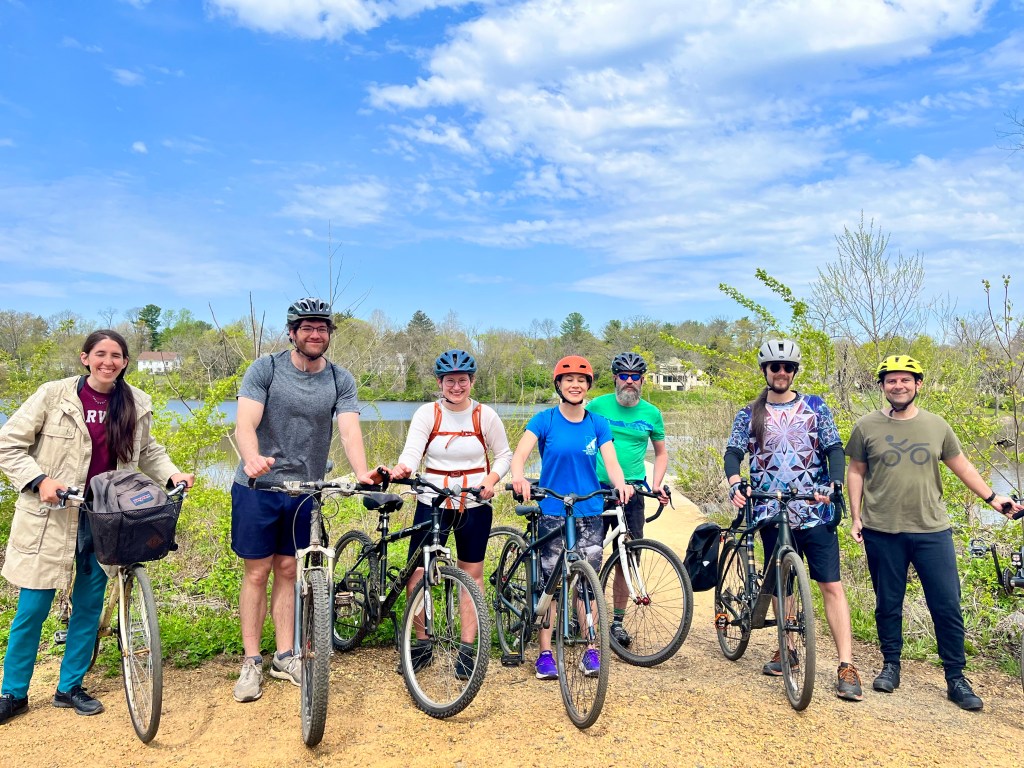
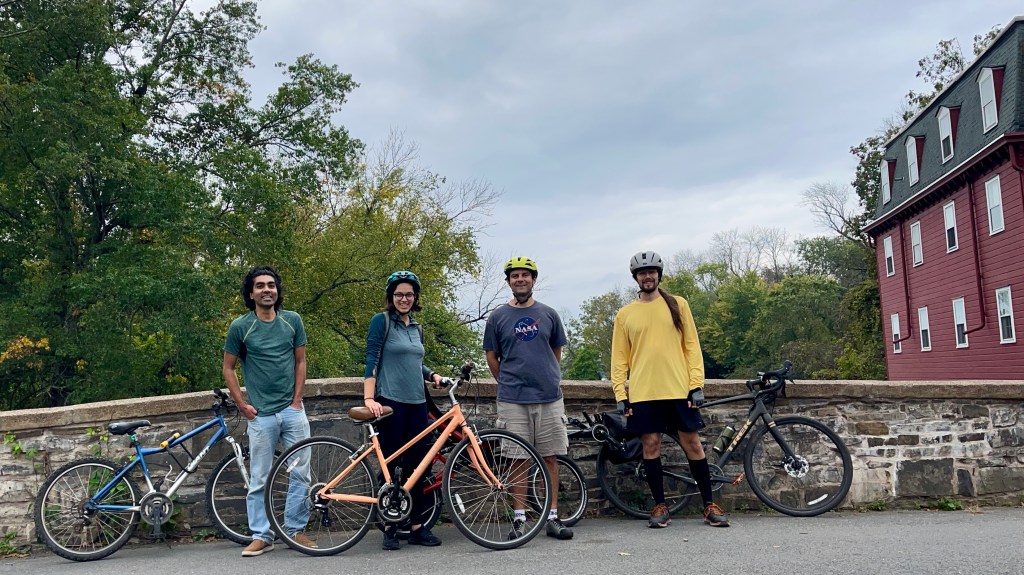
This past weekend the Psyclists got together after a month hiatus to brave the 90+ degree weather for a 14-mile excursion from Princeton to Lawrenceville.
We first rode through the comfortably shaded Institute Woods, and then picked up the D&R Canal Towpath southbound until we reached the Lawrence Hopewell Trail (LHT) connector. Here we were met with our first construction detour where we had to ride 0.5 miles along Meadow Road to Princeton Pike instead of following the LHT through the office park to reach Princeton Pike. Not a big deal, but just be aware of that small detour and follow the signs.
About a mile later we encountered our next obstacle: The LHT through the Lawrenceville School campus was closed due to construction. Getting around this one is a bit trickier, but all you need to do is make a left to go behind the field house and then travel on the grass along the south side of the pond. Eventually you’ll end up on Woods Drive which will let you traverse the campus. The upshot is you get to ride through the most scenic areas of the campus before reaching Lawrenceville Village.
In the village there are a few snack/drink options including Starbucks, the Gingered Peach, and the Purple Cow Ice Cream. We decided to turn around there, but one could continue to follow the LHT northward into Village Park and beyond.
The trails were in excellent condition, but we did struggle at times on the D&R Towpath where the gravel and sand would get a bit too deep for comfort. There isn’t much you can do in those situations beyond slowing down and trying to keep the bike steady to push through the gravel without wiping out. This is also where having wide tires, especially on a recumbent, is beneficial.
Next week we plan to explore some more of the LHT between Pennington and Lawrenceville.
Here’s our Garmin route for anyone interested in this ride.
While e-bikes can be a divisive topic among cyclists, it’s hard to ignore their increasing popularity. Admittedly it took me some time to warm up to the idea. Do I still get a workout? Is it “cheating”? After test riding an upright e-bike, I realized my worries were unfounded and it was time to transform the MINI once again. This time into an e-recumbent bike suitable for just about any terrain.
E-assist options
Azub offers attractive e-assist builds with Shimano Steps or Brose. The electric motors are integrated into custom booms, wires run internally, and the battery is mounted on the rack. Unfortunately, Azub can’t sell an e-assist upgrade (probably licensing-related?). Thankfully there are plenty of after-market options. While they won’t look as sleek, they’ll be a fraction of the cost if you don’t mind a little DIY work.
Some e-assist kits place the motors in the rear or front wheel hubs while others place them at the cranks (i.e. mid-drives). Two popular mid-drive manufacturers are Bafang and TongSheng. Both seem like good choices, and in the end, I decided to get the TongSheng TSDZ2 motor.
TSDZ2 specs and features
The TSDZ2 has a small form factor yet puts out an impressive 500W of power and 100Nm of torque. The 8 lb motor assists at up to 28MPH and/or 100RPM (you can always go faster but the motor won’t assist you). It can be installed on any bike that has a standard 68-73mm bottom bracket.
The most attractive feature of the TSDZ2 is the torque sensor which provides a more natural pedaling feel. With a torque sensor, if you pedal gently you get a gentle assist, and if you pedal hard the motor will assist more. In contrast, without a torque sensor, a motor will give a flat level of assist as long as you are pedaling. The torque sensor obviates the need for brake sensors to cut power since the motor is quick to respond when you stop pedaling.
While the motors are widely available, I purchased a recumbent-specific kit (the ECO+) offered by (now unfortunately closed) Eco-Cycles. They provide cable extensions to accommodate long recumbent frames, and a boom clamp specific to your boom diameter for securely mounting the motor. Eco also offers additional upgrades, including a software upgrade (OSF upgrade) that allows for custom assist levels and higher RPM assist.
The kit I chose included a more durable PEEK plastic gear inside the motor unit, the SW102 small LCD screen, and a 42T chainring to handle moderate hills. I skipped the throttle option in favor of always having to pedal. I also passed on the custom software upgrade to keep things simple.
Installation
My local bike shop, Kopps Cycles (also unfortunately closed recently), installed the motor onto the boom for me, and I installed the rest myself. I used zip ties to run three cables along the bike. One cable ran up the steering assembly to the display screen. Another cable ran to the back chainstays for a speed sensor. The third cable ran to the battery. I mounted the battery (52v 13ah Jumbo Hailong Shark; 11 lbs; 30-60 mile range) beneath the seat with the versatile T-Cycle universal battery mount.
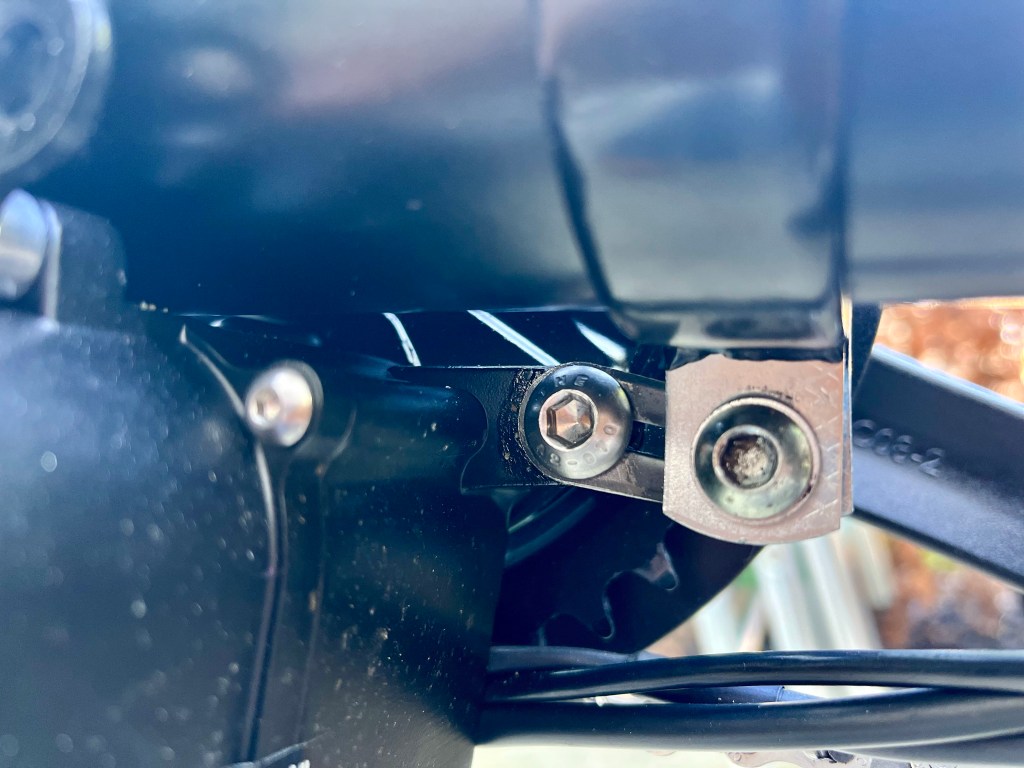
Azub owners take note of the braze-on for the derailleur cable on the boom. It’s situated exactly where the boom clamp for the motor wants to be.Fortunately, my LBS improvised a small bracket to push the position of the clamp back a few cm to clear the braze-on.
Riding with e-assist
It’s no wonder e-bikes are so popular. With the pedal assist, I no longer have to worry about how hilly a particular route is before I go out. I still have to work to get up those hills, but I can get there faster.
I can choose from four assist levels (eco, standard, super, turbo). With the torque sensing system, at each assist level, the system will add a percentage of the power you are outputting. So if I’m putting out 100 watts while using the first assist level, the motor will add 40% (or 40 watts) to the output. That percentage keeps going up at each assist level, so you can decide how fast you want to go at the output you’re producing.
Another benefit I had not anticipated is being able to quickly clear intersections from a stop. Cars don’t have to wait for me to get up to speed, and I can spend less time worrying about them getting mad. Relatedly, I can also be more patient since slowing down or stopping for others isn’t such a big deal when I can get back up to speed easier.
It’s only been a few weeks of riding my electrified MINI, but I can safely recommend e-assist to anyone looking to enjoy more time on their bikes without fearing those hills.
The following excerpt is from “Bike Snob” by the popular bike blogger, Eben Weiss:
Well over a hundred years ago the bicycle realized its current form, and it has remained largely unchanged ever since. However, there are some intrepid souls who refuse to accept this, and who embrace alternative designs for human-powered wheeled vehicles. And by far the most popular alternative “bicycle” is the recumbent.
The recumbent strikes fear into the hearts of nearly every non-recumbent-riding cyclist. If you’ve ever seen a dog growl at a plastic bag caught in a shrub because the dog thinks it might be some kind of weird animal, then you understand the reaction. Cyclists all notice one another, so when we see something that looks somewhat like a bicycle yet places the rider in an odd position with his feet kicking at the air like he’s defending himself from an attacking eagle we become confused and disoriented. And when animals (including humans) don’t understand something they become angry and defensive.
However, Contraption Captains mean no harm, and they’re simply operating machines they feel are superior to regular bicycles because they’re potentially faster and they don’t require the rider to sit on a narrow saddle. Of course, they also can’t negotiate tight corners, they’re heavy, they’re difficult or impossible to lock to poles or bike racks, they’re unwieldy and can’t easily be stored in small apartments or offices, they don’t climb hills well, and they require big tall flags since they’re below automobile hood level. Yet none of these things keep the Contraption Captains from polishing their helmet mirrors, combing their beards, packing a day’s worth of supplies in their fanny packs, and taking to the roads.
The Princeton Psychology/Neuroscience cycling group dusted off their bikes and reconvened after a long winter.
Today’s route took us along the scenic D&R Canal towpath from Princeton to Rocky Hill. From there we crossed to the other side of the canal and looped back with a stop at PJ’s Pancake House in Kingston for some coffee and snacks.
Interesting sightings included a few dozen sunbathing turtle, some hissing geese, and a great blue heron flyby.
In total, we rode 13 miles– most of which were flat except for the steep hill along Rt 27 into Kingston.
Here’s our Garmin route for anyone interested in the ride.
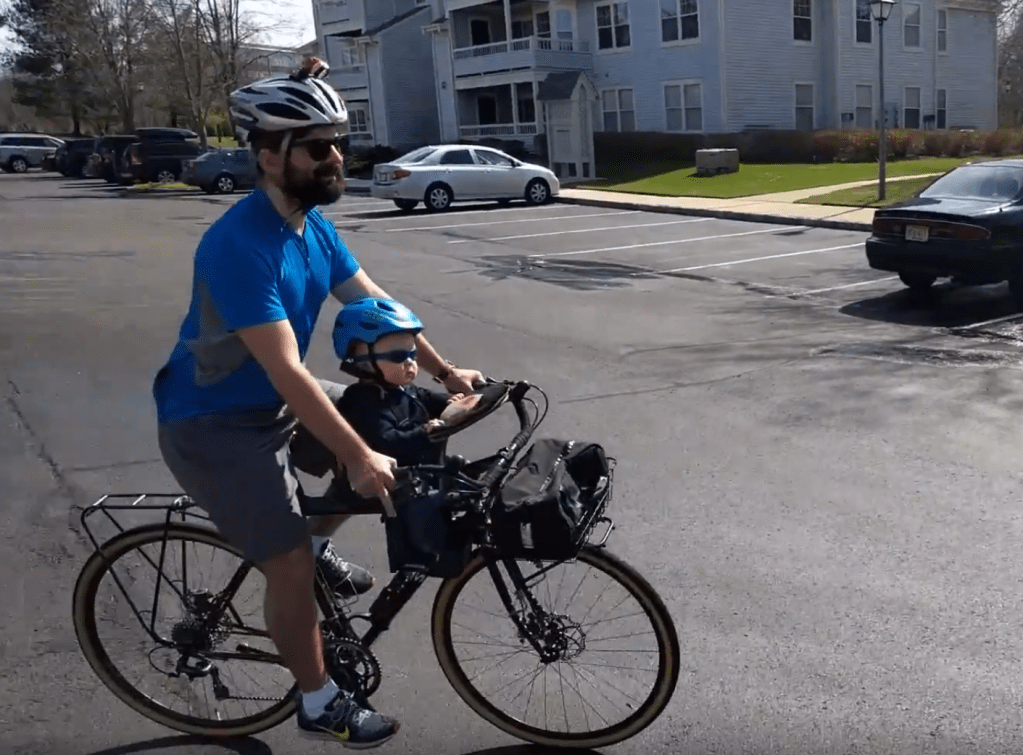
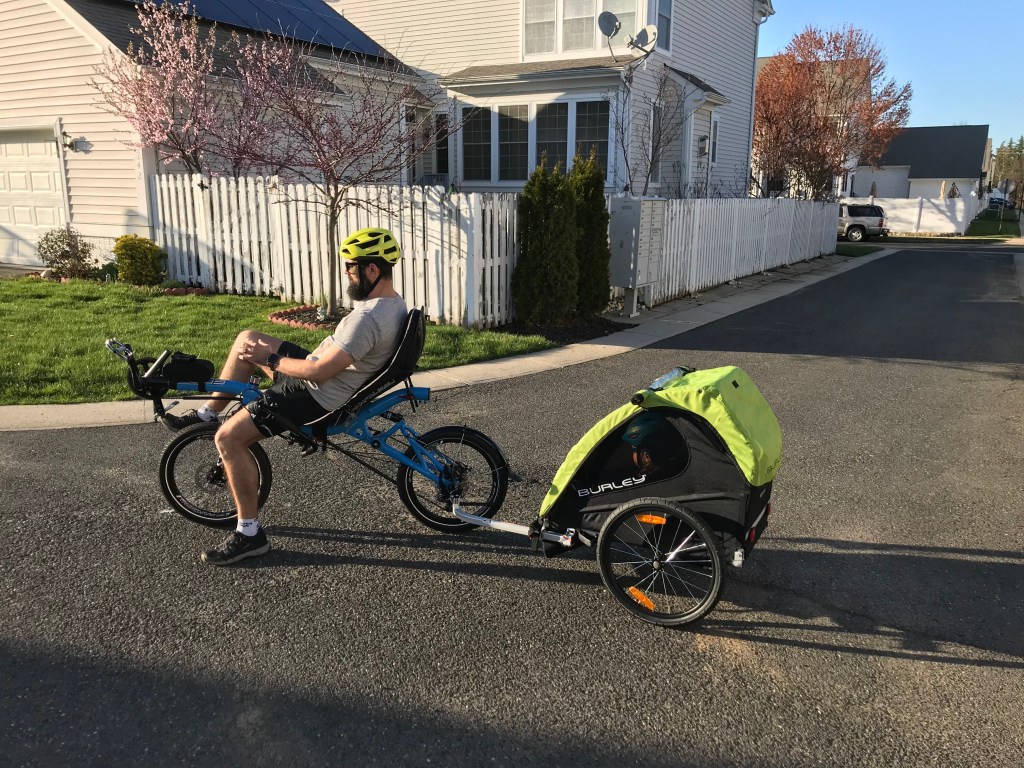
With a kindergartner on the verge of riding a bike on his own (I think it’ll happen this summer, but let’s not jinx it), I thought it may be fun to review the various contraptions (there’ve been many!) I’ve used to bring him along on rides ever since he could hold his little head up. Some of these child carriers won’t safely work with a recumbent bike or trike, but I did manage to adapt a couple of them as you’ll see.
Child-in-front seating
When my son was one year old, it made the most sense to have him in front of me within eyesight and also within reach in case of a fall. At that time I was riding a Surly Straggler that was set up as an upright and comfortable commuter.
I chose the Kangaroo by Kazam because unlike other front child seats that mount directly to the steerer, the Kangaroo mounts to a bar behind the head tube. This bar runs along the length of the bike and is secured to the seat tube at the rear and the head tube at the front. I like this design because it prevents the child from being a counterweight which would make steering more difficult.
The Kazam Kangaroo mounts to a bar that ran along the top tube, thereby maintaining a good central weight ditribution on the bike that made handling easier.
Child-in-rear seating
The following year we tried the Thule Yepp Maxi rear seat. A unique feature of this seat is that it can mount directly onto a luggage rack or to the frame’s seat tube with a special attachment. In my case, I didn’t have much confidence in the strength of my rear rack, so I opted to mount it to the seat tube.
The seat is made of lightweight, high-quality foam-like material that provides both comfort and built-in suspension. The footrests are adjustable and have shielding to prevent little feet from hitting the rear wheel.
When I bought my first recumbent, I was hoping to attach the Yepp Maxi to the bike, but decided against it. While I did find one instance of someone mounting a rear child seat to the rack of an Azub recumbent bike, it didn’t looked particularly safe to have so much weight on the rear rack.
The Thule Yepp Maxi was well built and seemed comfortable enough for the little guy to fall asleep on many rides.
Bike trailer
Bike trailers are safe, all-weather solutions to bringing a child along on a ride. They mount to the rear axle of your bike with a small hitch attachment and work as well on recumbent bikes as they do with regular bikes.
My son enjoyed some rides in the comfort of a Burley Bee bike trailer, not unlike a little king being pulled in his chariot. Unfortunately, he got bored and lost interest. I don’t blame him. In the trailer, you don’t feel the wind on your face, and you’re too far to chat with Mom or Dad. I’ve met families that routinely use bike trailers, but it wasn’t working for us.
A bike trailer can be used with just about any kind of bike since it attaches via a hitch at the rear axle. Just consider that your child may get a bit bored back there.
Pedaling “Weehoo” trailer
The Weehoo is a single-wheel bike trailer where the child is seated in the recumbent position (!!) and has a set of functioning pedals in front of them. The seat position can be adjusted fore/aft, and it comes with useful features like a removable canopy and panniers for storing snacks and a jacket.
Because the Weehoo attaches to the seat post of your bike, it won’t work with most recumbent bikes. That being said, I was set on using this (after all, it was a $20 Goodwill find by my wife!). Because my Azub MINI’s frame is open in the back to receive a rack, I designed a faux seat post that could be inserted into the frame in place of the rack, and had it fabricated by a local machine shop.
The best thing about the Weehoo trailer is that the child can pedal if they want to and feel like they’re participating in the ride. This was a game-changer for my son. He had a blast and learned how to pedal without the fear of falling.
Here is the custom faux seat post inserted into the Azub MINI frame to pull the Weehoo trailer. There are two QR skewers that squeeze the frame to hold a rear rack in that location, so I also drilled a hole through the frame for a clevis pin to prevent rotation of the post assembly.
Tow bars and tag-alongs
Both tow bars and tag-alongs attach to your bike’s seat post. A tow bar, such as the Trail Gator, lets you tow your child’s bike, while tag-alongs are essentially bikes without a functional front half.
We’re currently experimenting with the Trail Gator using the faux seat post on the Azub MINI. So far it seems to work reasonably well, provided the tow bar is attached as high as possible on the seat post (otherwise the entire setup is too unstable). Generally, I think the tow bar is a better option than a tag-along since it allows the child to “detach” and ride solo when they want and then be towed when they tire out.
One other device worth mentioning in this category is the FollowMe Tandem. It’s similar to a tow bar in that it allows you to pull the child’s bike. However, instead of attaching to the seat post (which limits its use with recumbent bikes), it attaches to the rear axle and seems much more stable. The FollowMe Tandem should work with just about any recumbent bike as well, as long as the rear wheel is at least 26”. Sadly, because my current recumbents are both 20”, I can’t try one out at this time.
Update: We tried another tow bar called the Trail Angel, and it is MUCH more stable compared to the Trail Gator. The Trail Angel attaches to your seat post just like the Trail Gator, but it secures to the child bike at 2 locations instead of 1: the head tube and the front fork axle. Skip the Trail Gator and get this. It even folds up and out of the way when you detach the child’s bike.
Here’s our first attempt with the Trail Gator tow bar and a Woom 4 kid’s bike. I think the stability of the towbar could be improved if the faux seat post was a bit taller to match the height of a regular bike’s seat post.
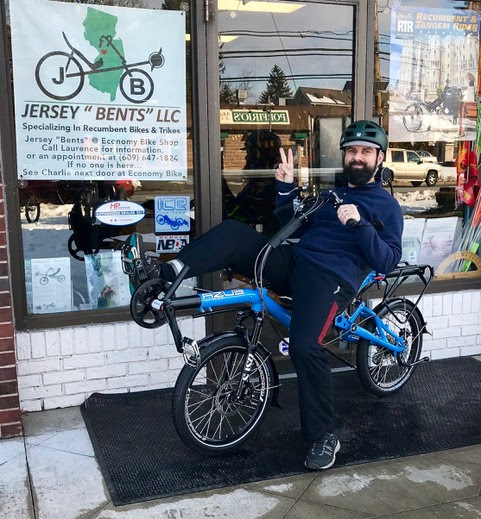
A happy new bent rider picking up his bike at Jersey Bents in Hamilton NJ (the shop has since moved to Berlin NJ).
The MINI was my first recumbent, and I’ve ridden it regularly for the past four years. Now I’m riding a similar bike, the Azub Origami, that I’ll review in a future post. Be forewarned, given the significant time I’ve spent in the saddle with the MINI, this will be a detailed review.
By 2018 my back problems convinced me it was time to stop riding a regular bike and seriously consider a recumbent. After a few months of internet research (mainly on the popular BentRiderOnline forums), I decided on a bent for leisure riding and commuting: one that had full suspension to smooth out the ride, and small 20” wheels to reduce my falling distance. I (incorrectly) figured falling was inevitable having never ridden a recumbent.
Basic specs
The MINI is a short wheel base (SWB), compact dual 20″ aluminum frame recumbent with rear and optional front suspension. It’s about as long as a standard bike (165 cm) with a wheel base of 109 cm, so it can be stored in relatively small spaces. The MINI is known to be easy to ride and master, quite maneuverable, and have good acceleration due to the small wheels. These characteristics make it best suited an urban/commuting environment, but it can also handle itself off-road.
The MINI as it originally arrived with above seat steering.
I configured the bike with a few upgraded options: disc brakes (Avid BB7), air suspension (MEKS SASO front and SR SunTour rear), SRAM dual-drive drivetrain, carbon fiber seat, and above seat steering. Unfortunately, right around the time I received the bike, I was affected by ulnar nerve issues originating at my elbows and making it difficult to use the above seat steering. Thankfully the steering on Azub bikes can be easily switched, so I contacted Azub and had them send me an under seat steering (USS) system to swap in.
Comfort
The bottom bracket is positioned just slightly above the level of the seat bottom, making this a comfortable touring bike while still allowing good power transmission from the legs. The full suspension was very plush. The frame and fork allowed for wide tires, such as the 2” Big Apples to further improve comfort. I don’t know if the upgraded rear air shock absorber feels any different from the standard spring shock, but I had no complaints about it. The shock absorber even had a lock you could reach around and engage while riding up a steep incline to cut out any loss of energy from the minor bouncing “pogo” effect as you pedaled.
The hard-shell seat fit like a glove and could be reclined to around 35 degrees. When first starting, I had the seat positioned closer to 45 deg. and slowly reclined it as I became more confident. The seat’s incline and fore/aft position can be changed on the fly with convenient quick-release skewers. The Azub headrest does a decent job but is difficult to adjust without a small wrench on hand.
I should mention that the Azub SIX and Azub MAX are almost identical to the MINI. Their main difference is the wheel sizes. The MINI is 20×20, the SIX is 26×20, and the MAX is 26×26. I test rode them all, and while I was not tall enough for the MAX (I felt uneasy having just my toes reach the ground at a stop), I did consider the SIX until I realized that the larger rear wheel on the SIX prevented the seat from reclining as much as on the MINI. If you’re considering similar bikes, the SIX and MAX are worthwhile options, especially since the larger rear wheels allow those bikes to have both higher gearing and less rolling resistance over large obstacles.
Drivetrain
The SRAM DualDrive (DD) system consisted of a 9-speed cassette/derailleur along with a 3-speed rear internal gear hub (IGH). The system provided an ample 540% gear range and kept the front of the bike clear of multiple chainrings and a front derailleur. The drivetrain is controlled with one hand using a combined twist (for the 9 gears) and trigger shifter (for the 3 IGH gears) on the right side. A rider can fine-tune the gear range by swapping out the single front chainring.
As a first-time bent rider, it was easy to see why Azub offered this drivetrain option. Starting from a dead stop on a recumbent can be tricky, especially uphill. Incorporating an IGH allows the rider to shift to a lower gear while at a complete stop. So you can get out of a bind when you find yourself at a standstill and in the wrong gear.
The DD system worked reliably, but unfortunately, SRAM decided to discontinue them in 2017. Probably the biggest concern I had with this system was the fragile plastic click box that connected to the IGH via an equally fragile pull rod. Instead of the DD system, Azub now offers a nearly identical drivetrain by Sturmey Archer.
Brakes
The Avid BB7’s are popular brakes that work well without much fuss. They don’t provide much range when you want to feather the brakes, but they have plenty of stopping power.
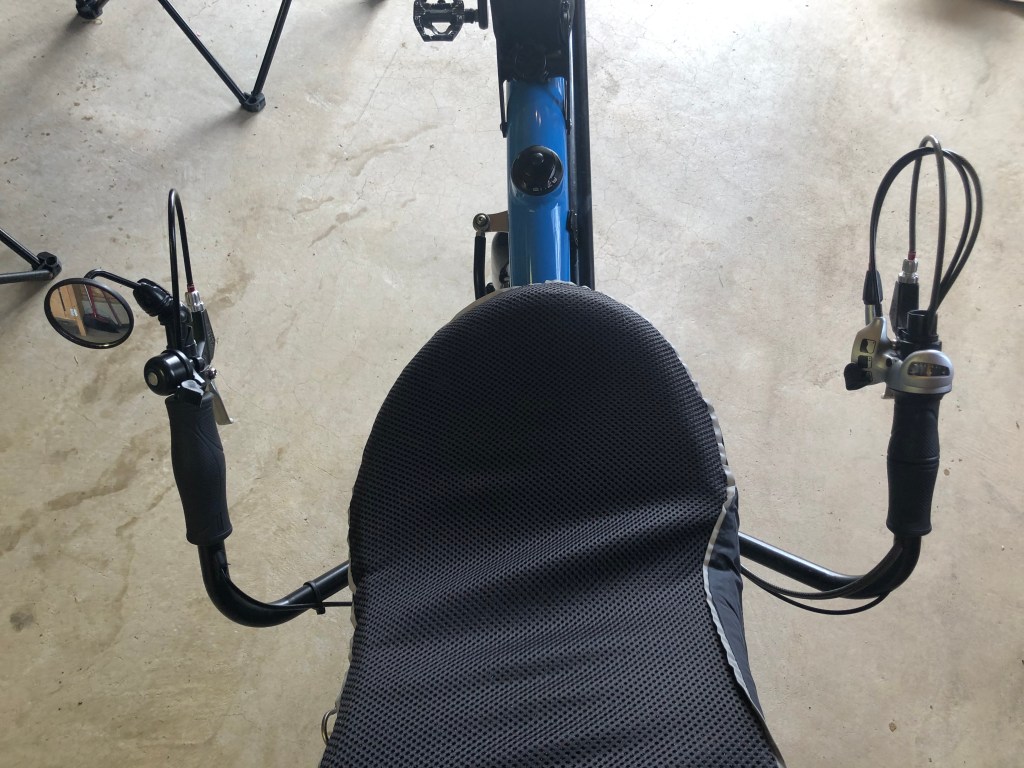
Top-down view of the under seat steering setup where you can see both the brake and shifter cables protruding out and looping back in.
Azub mounts the brake levers on the USS handlebars in the “correct” orientation. By that, I mean when you grip the levers your pinky finger is closest to the end of the lever (as it would be on a regular bike). This provides the rider with a more natural feel when squeezing the levers, but it also means you end up with unsightly brake cables protruding out the ends of the handlebars and looping back in. In contrast, HPV orients the levers on their USS bikes the opposite way so that the brake cables follow along the handlebars as they exit the lever (yeah yeah I know I’m being picky here). As much as I like the lever orientation that Azub uses, I’d rather have less cable clutter and I did in fact change the lever orientation later for a cleaner look.
Ride stability and steering
The MINI is stable at both low and high speeds, thanks to the long wheelbase. I’m able to keep a fairly straight line even while climbing steep hills. The bike also handles itself at high speeds. My comfort level maxed out around 32 mph during some fast descents. I found its stability made it easy to learn how to ride and I never fell over. Also, being able to modify the steering ratio of the USS handlebars is a lot of fun allowing you to dial in the steering exactly how you like it.
Carrying capacity
Despite its small appearance, the MINI is rated at 275 lbs. The way the rear luggage carrier integrates into the main frame of the bike is clever. You can mount a trunk bag and a pair of pannier bags on the carrier. If you don’t need the carrier, you can slide it out of the frame and insert a plastic plug on the end of the frame. For more capacity on long tours, Azub offers additional side and bottom carriers as well.
Weight and custom upgrades
My biggest complaint about the bike was the hefty weight. Sure it wasn’t designed to be fast, but the bike weighed in at an impressive 45 lbs. I wanted to lighten up the bike, not just to help me get up those hills, but also so that I could lift the thing onto my car. So over the years I replaced many of its components with lighter counterparts.
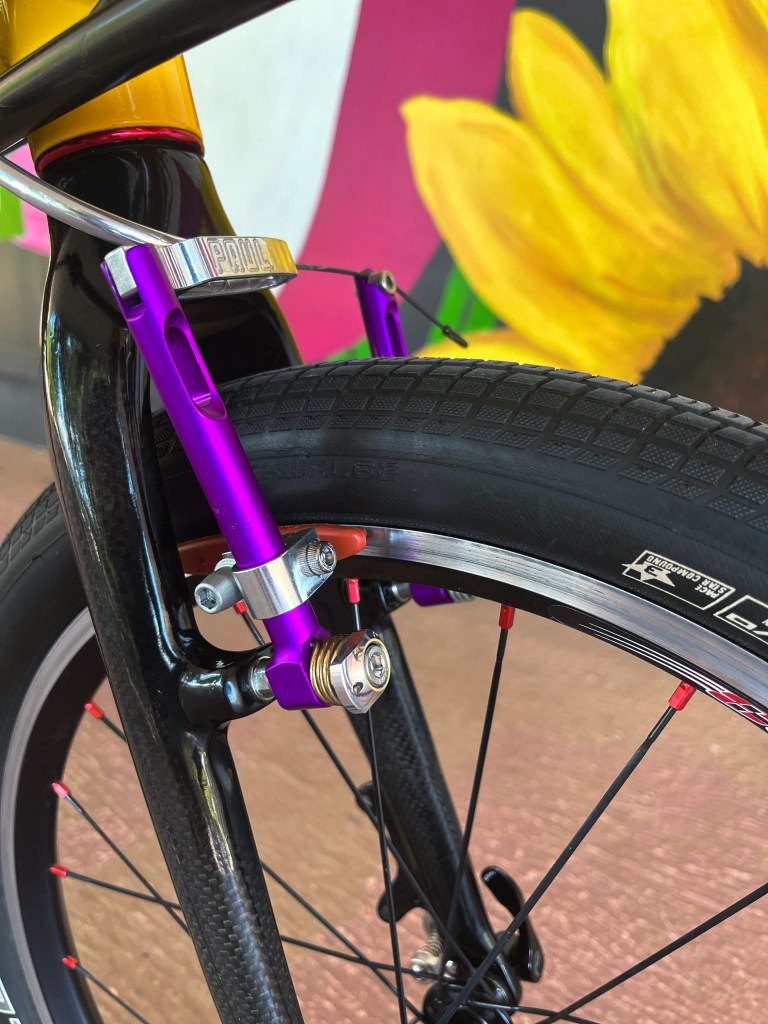
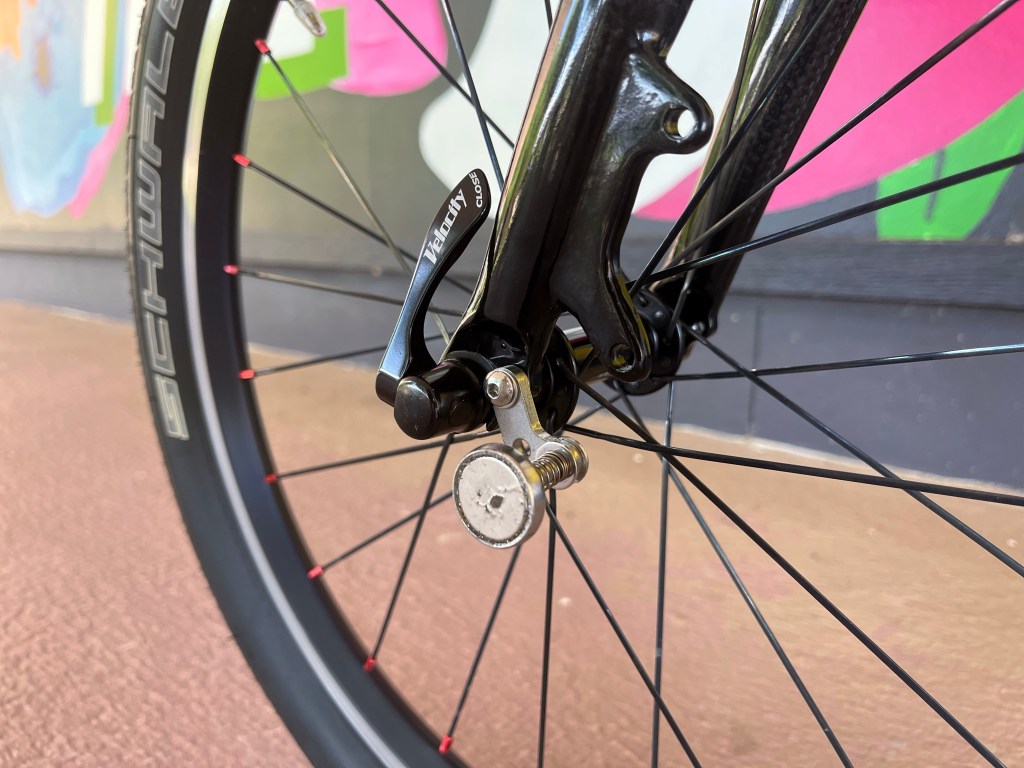
I ended up replacing the stock wheelset with Velocity A23 wheels, the disc brakes for v-brakes (Paul Components), and the DD drivetrain with 11-speed road components (SRAM RED 11-32 cassette, rear derailleur, and bar end shifter).
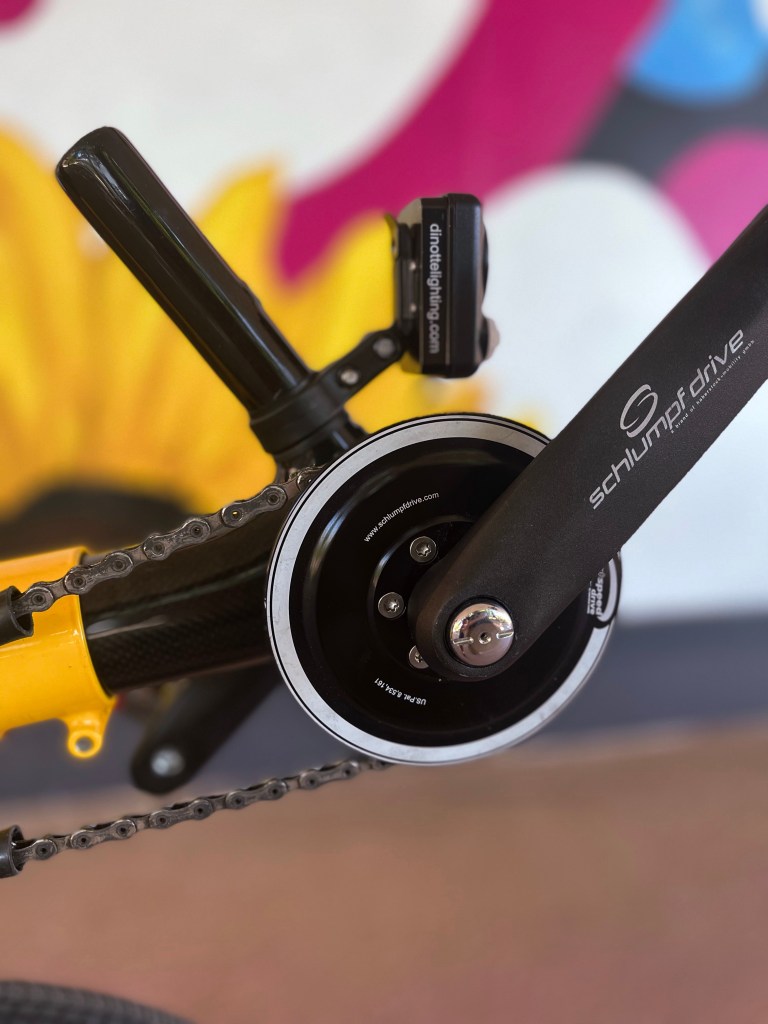
For the front of the drivetrain, I was planning on a standard 34/50 double but soon realized my upper gear range would be severely limited by the small rear wheel (maxing out at 84 gear inches). Instead, I opted for a popular 2-speed front IGH, known as a Schlumpf Drive. This gave me the equivalent of 30/75 in the front (727% range; 18-125 GI).
I also replaced the front fork with a carbon fiber (CF) Bacchetta Johnson fork, and the aluminum front boom with a CF version from HPV. Since most of my riding was on the road, the loss of front suspension wasn’t too detrimental to the ride quality and the switch to CF provided significant weight savings.
Replacing the front boom with a carbon fiber one from HPV (left panel) required a 0.5 mm plastic shim (center panel) because the boom was a millimeter too narrow in diameter. The final assembly with the Schlumpf drive (right panel) included a 30T chain ring and 155 mm length cranks.
Sizing up the competition
Besides the MINI, there is one other bike available stateside that is fully suspended with dual 20” wheels: the HPV Grasshopper FX. Fortunately, the only recumbent shop in NJ was a few minutes away from me at that time, and I had the opportunity to test ride both bikes and agonize for weeks trying to decide between them. They are similar bikes and either one would have been fine. One major difference is that the Grasshopper can fold up. In the end, I appreciated the design elements of the MINI and found its seat a bit more comfortable. I also liked that the Czech company has a reputation for making their bikes rugged and overbuilt for heavy world touring.
Final remarks
The same MINI after a few years of upgrades and a new paint job.
When all was said and done, my MINI ended up weighing a more manageable 30lbs and being an even more pleasurable bike to ride. Since switching to the Origami a few months ago, I’ve swapped most of the above upgrades over and returned the MINI to nearly stock form.
The MINI is currently on loan with a recumbent-curious friend. I’ve been considering selling it, but after writing this review I’m having second thoughts. Maybe I can make some space to keep it. After all, suspension recumbents with USS are a rare breed nowadays.
Thanks to the good folks at Azub and Jersey Bents for answering my non-stop questions about their bikes.
The handlebars on a recumbent may be mounted below the rider so that their arms hang in a relaxed position. Known as under seat steering (USS), this is arguably the most comfortable and least tiring steering position since you’re not reaching up to grip the handlebars. That said, it can be a bit trickier mounting/dismounting a bike with USS without practice, and you’ll be less aerodynamic when riding since you’ll have a wider profile against the wind. It’s also worth noting that USS is more mechanically complex and expensive, often requiring non-standard bike parts including a tie-rod to link the bars to the fork (known as indirect steering). There are a few USS bikes out there with direct USS steering where the handlebars connect directly to the steerer with a stem (just like a regular bike but inverted), but the handling can be a bit too twitchy with direct USS steering. In contrast, indirect steering often allows the rider to fine tune the feel of their steering by changing the placement of the tie-rod to adjust the steering ratio.
Personally I’ve found USS to be the ultimate design in recumbent comfort. My first recumbent came with above seat steering (ASS- see next section below), and I immediately had to switch it to USS because my elbows were giving me problems. Despite the comfort, USS did get annoying when I needed a good place to mount accessories like my GPS. Having USS also made it harder to walk my bike since I had to bend over it a bit to steer it, and I needed a wider space for parking or storing the bike. My elbow pain improved a few years later after a couple surgeries (cubital tunnel release and ulnar nerve transposition), and I did switch back to ASS without much of a problem mainly for the sake of convenience.
If you’re interested in USS bikes, you have a few options in the US including Azub, HP Velotechnik, Linear Recumbents, and Long Bikes. In Europe you’ll have a few more options with Challenge Bikes (Netherlands), and Flux and Toxy (in Germany). Just note that the HPV Streetmachine and Toxy bikes use direct steering, and may be a bit more tricky to ride.
My Azub MINI with USS. Note the relaxed arm position and wide profile that USS provides. The 3rd photograph shows the tie-rod linkage at the handlebars (the opposite end connects to the fork steerer) along with the 4 positions available to allow adjustment of the steering ratio.
Above Seat Steering (ASS)
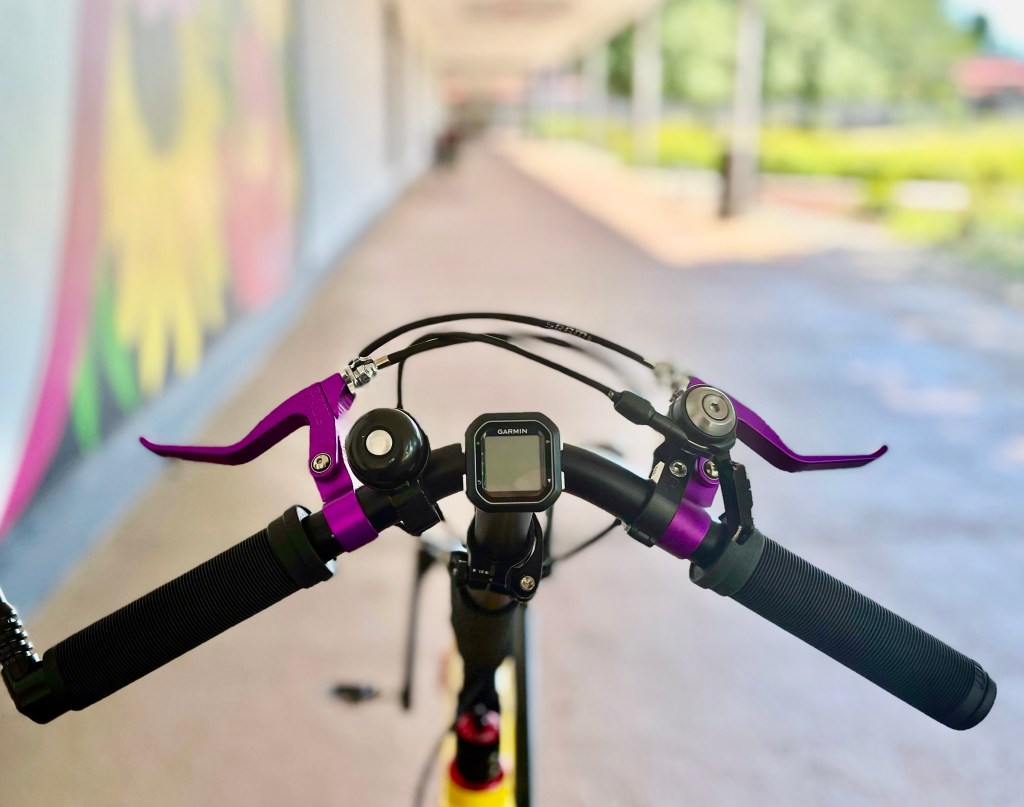
When the handlebars are mounted over the rider’s lap and they have to reach up to them, the bike is known as having above seat or over seat steering (ASS or OSS). Compared to USS, ASS is more aerodynamic and generally easier to learn. You’ll have some choices regarding the shape of the handlebars: “praying hamster bars” that keep your arms in a tight position close to your chest versus “superman bars” where you are gripping onto wide bars in what is called an “open cockpit”. The superman bars are more ergonomic since they keep your hands/wrists in a neutral position where you don’t have to rotate your wrists to hold onto the handlebars. ASS does require your arms and shoulders to be more engaged compared to USS, so your arms will tire after a while. Unlike USS, you’ll have plenty of room on the handlebars to mount accessories such as mirrors, bells, and lights, but you may also have worse visibility with the handlebars blocking your line of sight (especially if you are in an extreme horizontal position).
A few shots of my Azub MINI with ASS. These are “praying hamster bars” where your arms and hands are tucked in close to your body.
Pivot Steering
There is a less common type of steering out there known as pivot or center steering. On these bikes, there’s a pivot at the center of the bike, allowing you to steer the front wheel by leaning. These bikes may come with side bars to help you lean into a turn, and may have no handlebars at all! I’d love to try such a bike one day, but the only center steering bikes I’m aware of are old Flevobikes from the Netherlands.
Last November I covered the various types of recumbents based on length. To review, the long wheel base (LWB) ‘bents are super comfy machines made for putting in long touring miles in a fairly upright seating position, whereas the short wheel base (SWB) ‘bents tend to be more versatile bikes used for racing, commuting, or just about anything else.
The SWB versatility is largely due to the variety of designs out there. Today I’ll cover some designs as they relate to the rider’s seated height from the ground.
Low-racers
You’ll often hear SWB ‘bents categorized as low-, mid-, or high-racers. Low-racers seat you very close to the ground— so low that you can balance yourself by placing your palms down. They’re aerodynamic and fast bikes that are good for flat tracks, but have fallen out of mainstream favor. Low-racers remain popular in racing, velodrome use, and certain European circles. A low-racer is difficult to ride given the seat’s nearly horizontal position, and isn’t too visible to traffic on the road. Builders are forced to get creative with the drivetrains and complex chain lines given the limited amount of space between the rider and the ground. They often have a small 20” or 16” front wheel paired with a larger 700c rear wheel. Performer Cycles, M5, and Toxy still have some low-racer options. The Swiss company Wolf&Wolf make recumbents that are pretty low to the ground, but with a more upright touring geometry (not for racing).
A Performer Cycles low-racer model. Note the highly reclined and low position of the seat, as well as the complex chain line that requires 3 idlers and protective chain tubes.
High-racers
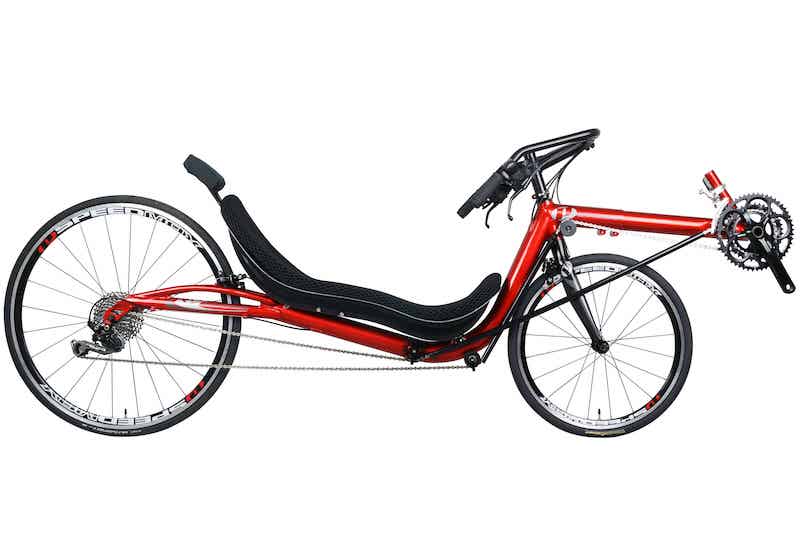
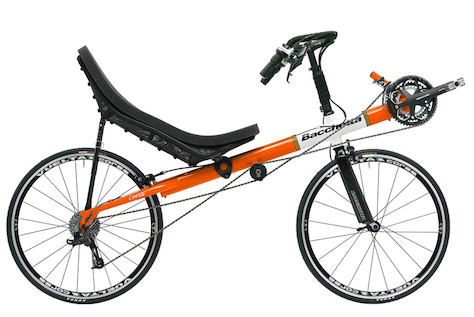
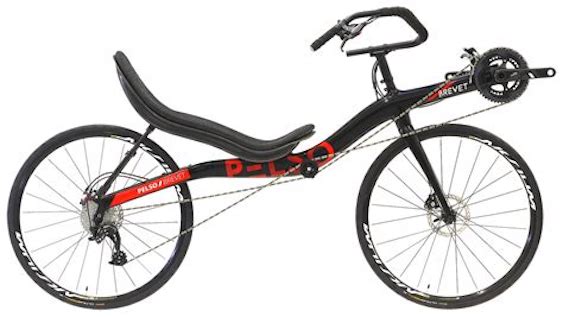
High-racers are also fast bikes, and offer much better visibility in dense traffic. They tend to be light-weight and have simple, straight chain lines. They have dual 700c wheels, and their frames are usually American-style “stick frames” exemplified by Bacchetta or European-style “s-frames” such as the Pelso Brevet, Schlitter Freestyle, or Slyway Ultra. The largest disadvantage with high-racers (especially stick frames) is they don’t easily accommodate short riders. If you are under 5’9” or so, you’ll likely have trouble getting your feet down at a stop on a high-racer. The problem is as you slide the seat position forward along the frame’s tube to be able to reach the pedals (which are positioned at an elevated level), you are also sliding the seat higher from the ground. The S-frame design helps alleviate the problem a bit by sloping the frame tube down. Most recently, Metabike introduced a novel multi-tube high-racer design (the Mystique) with a seat height that allows riders as short as 5’6” to get their feet down (being 5’8”, this particular bike is appealing to me as I’ve always wanted a high racer but I’m not tall enough to feel safe on one).
Given the high seating position and bottom bracket (i.e., where the pedals are), high-racers aren’t made for off-road terrain where you may need to quickly get your feet down to avoid falling over (that being said, there is one crazy exception out there).
The Bacchetta Corsa (left) and Pelso Brevet (right) are two examples of modern high-racers with dual 700c wheels. Note the respective stick and s-shaped frame designs, as well as the simpler chain lines requiring only one idler under the seats.
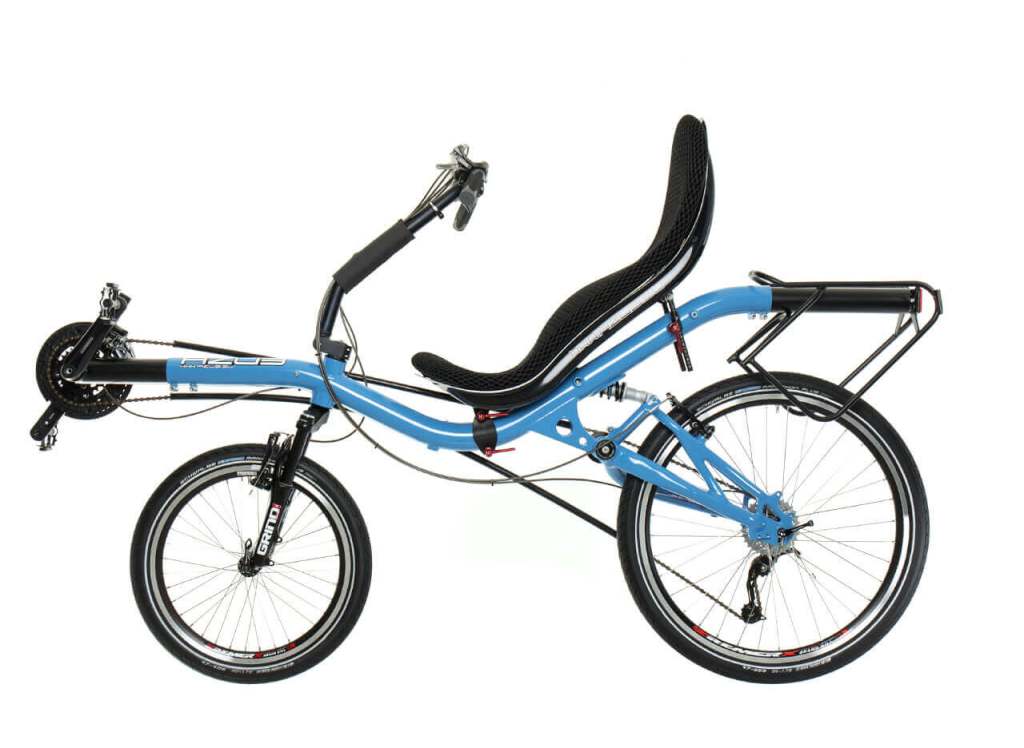
Mid-racers
As you may expect, mid-racers fall between the two extremes. They’re the most popular choice of SWB ‘bent since they offer much of the visibility and aerodynamics of a high racer without limiting rider height. You’ll find options for racers, commuters, and tourers in this category, along with a variety of options in wheel size, suspension, seat type, drivetrain, and steering to accommodate all sorts of riding and terrain. Take a look at Azub, HPV, Lightning Cycles, and Performer Cycles for good mid-racer options. Most of my recumbent bike experiences have been on mid-racers, and my current everyday bike is a commuter-type mid-racer design (I’ll talk about it in a future post).
The Azub Six (left) and Lightning Cycles R-84 (right) are both mid-racer designs with different purposes. The Six is a stout aluminum, full suspension bike intended for long distance, multi-terrain touring, while the R-84 is a light-weight carbon bike for roadies.
With the holiday season already here, why not do some shopping for that special cyclist in your life (or simply treat yourself). Here are a few of my all-time favorite bike accessories. Some are more recumbent specific, while others are appropriate for just about any bike.
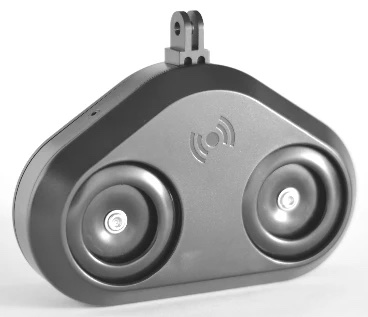
If you ride in traffic, ringing bells and using your voice just doesn’t cut it. I absolutely love this thing. It uses micro-USB charging and a universal go-pro mount (so you can mount it just about anywhere you have the space). They offer button extension cords, which are really handy for long recumbent bikes. And most importantly, this thing is LOUD (125 db) and sounds JUST like a car horn. I kid you not. Nothing is more satisfying than beeping an inattentive driver with this. At $179, the Loud Mini is certainly not cheap, but it’s the best horn out there as far as I’m concerned and worth every cent the instant you have to use it.
Dinnotte Lighting is a well regarded company run by Rob Skaff up in Hampton NH. Rob’s been manufacturing high performance LED lights for over a decade with the idea that bike lights need to be as bright as car lights to be effective. I like the unique, compact design of their lights, and their latest models provide convenient USB-C charging. Their amber lights are more visible to motorists than typical white lights during the day time. Get the Quad headlight + taillight package (recently renamed to the Ambra and Rossa) for $219. These are lights meant to last a lifetime, and Dinnotte offers reasonable battery replacement or trade-in services.
This mirror is made in Germany and can be hard to find here at times. It often goes by different names (usually the Ortlieb Ultralight Mirror or the D+D Oberlauda UltraLight Mirror). It’s designed for touring and commuting or just about any situation in which there’s a need for greater visibility. Hands down it is the best mirror out there. It’s extremely light (2 oz), provides a really wide field of view, and it’s easy to adjust on the fly. The way it mounts is quite versatile which makes it a great mirror for recumbent bikes where you sometimes have to get creative with your mirror placement. I’ve gone through many mirrors over the years and consistently come back to this one. It is reasonably priced, and currently $30 at ModernBike.
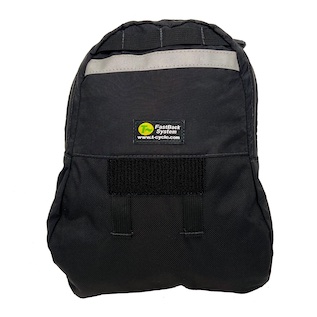
For the recumbent rider, sometimes you need a compact bag to hang over the back of your hard shell seat just to carry some essentials. I use this bag to hold my phone, keys, wallet, and a few other small things on my commuting recumbent. It’s a very simple bag with a convenient Velcro attachment system, and its slim profile allows it to fit over the back of even the most reclined hard shell seats. T-cycle has these for $105.
If you’re an iPhone user, do yourself a favor and pick up an Apple AirTag or two. To mount one to your bike, I recommend a mount by Marshall of Project4AGZE on Etsy. There are tons of mounts out there, but his are good quality, handmade in USA, and durability tested by Marshall himself over thousands of miles and races. These mounts fit behind the water bottle cage, and are so slim that they’d likely go unnoticed by a bike thief. You can pick one up for $8.99.
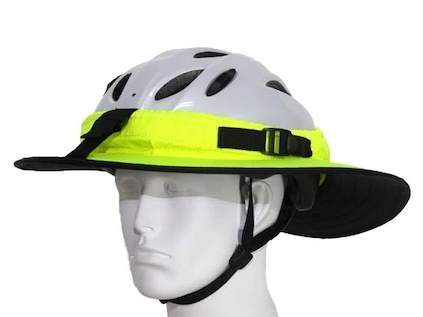
In case you’re not drawing enough attention riding your whacky recumbent bicycle, add one of these helmet visors by DaBrim. If it’s not apparent in the picture, they are huge and look absolutely ridiculous. That being said, yes I have a bright yellow one. I don’t wear it often, except on those long sunny summer rides. These things do an amazing job keeping the sun out of your face, especially on a recumbent where you’re not hunched over looking down at the road. Available for $55. Strangely there are no pictures of me wearing one that I could share…
While the condition of the NJ towpath made for very easy riding with well packed fine gravel, the PA side was in dire need of maintenance on the northern end. Once we reached New Hope on our way back down to Washington Crossing, the PA towpath did improve dramatically.
In the next few posts I’ll review the major design choices and terminology of 2-wheeled ‘bents.* These won’t be exhaustive in-depth technical reviews, but by the end you should be able to ID almost any recumbent you see by one or more of these defining features.
One of the most visible differences between recumbents is the length of their wheel base. Specifically the location of the crankset (where you put your feet to pedal) relative to the front wheel determines whether the bike has a short or long wheel base.
Long wheel base (LWB)
When the crankset is positioned behind the front wheel, it pushes the front wheel farther out and gives you a long wheel base recumbent. For the most part, the LWB ‘bent is an entirely American phenomenon, and I suspect that has something to do with the US’s immense size and love for the open road. These bikes are ideal for long tours, and I like to think of them as the Cadillacs of recumbents. Their long wheel base helps soak up the bumps without the need for complex suspension. Their cranks are positioned lower than the seat height (i.e., so your feet aim downward), making them easy to learn. The seats are relatively upright to give you a good view of the road ahead. The frames are often made of steel, and can handle heavy loads. They typically have a larger 26-29” rear wheel paired with either an equally large front wheel or a smaller 20” wheel.
The physical dimensions of a LWB do pose some potential problems. For one, the wide turning radius gives it a slow response time and doesn’t make a LWB suitable for narrow and windy bike paths. One also needs quite bit of space to store such a long bike, and of course transporting a LWB can be problematic without a large SUV, pickup truck or minivan.
Unfortunately the LWB is a dying breed with only seven companies currently producing them. With so few remaining I feel compelled to list and link to each of them. They’re each quite unique and beautiful designs. We’ve got the Bacchetta Bella, the Carver Ti-Glide, the Linear Limo, the Longbikes Slipstream, the Recycled Recumbents Mach 2, and the Sun Seeker EZ Sport. While the used market is full of classic LWB bikes, those interested in a LWB should really consider keeping them alive by supporting one of the remaining companies.
Two examples of LWB recumbent bikes. On the left is the Bacchetta Bella and on the right is the Longbikes Slipstream. Note the popular 26″/20″ wheel combination on both bikes. You can also see the low crank position relative to the seat bottom, making these ideal comfort/touring bikes that are easy to get your feet down from. One key difference between these two bikes is the type of steering (above seat vs under seat), but that’s a discussion for a future post.
Compact long wheel base (CLWB)
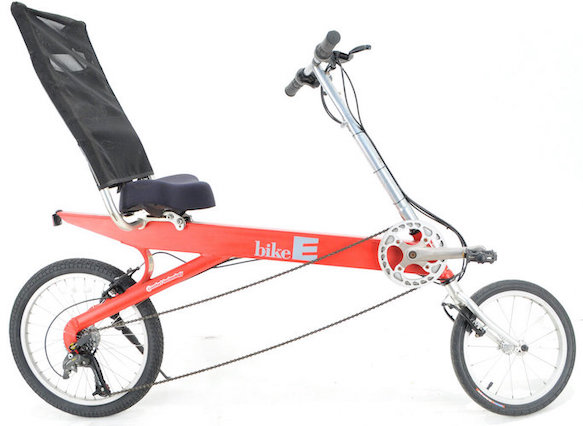
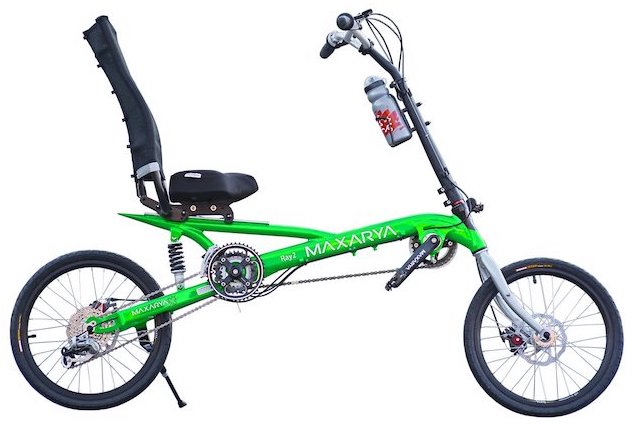
The CLWB, as the name suggests, is a shorter LWB bike with a small 20” rear wheel and even smaller 16” front wheel. The crankset is located very close behind the front wheel. Back in the late 90s and early 00s, they were the most popular type of recumbent as they were low cost and very easy to maneuver, transport, and store. The most popular recumbent bike of all time was the Bike-E, a mass-market CLWB sold at many bike shops across the US. Sadly by 2010, lower priced trikes started to become popular, squeezing the already niche entry-level recumbent market into oblivion. You may still be able to find a new Maxarya, but otherwise you’re relegated to finding a used Bike-E online if you want a CLWB.
The Bike-E (left) was the highest selling recumbent bike before its demise in the early 00s. Today the Canadian-based Maxarya (right) is one of two remaining CLWB brands.
Short wheel base (SWB)
By bringing the wheels closer together and putting the crankset out ahead of the front wheel, you get a relatively compact and versatile recumbent bike. If LWB ‘bents are the Cadillacs, then SWB ‘bents are the Corvettes. They are not much longer than a standard DF bike, and most of them can be transported on standard car bike racks. Some SWB bikes allow for more sporty positions with reclined seats and higher cranksets, and have more responsive steering compared to their longer counterparts. They are lighter and faster compared to LWB ‘bents, and their frames are usually made out of aluminum tubing or carbon fiber.
The SWB may be a bit difficult to learn to ride. Your feet are higher off the ground, the steering may feel more “twitchy” compared to a LWB, and you’ll experience a bumpier ride with the front wheel pulled in much closer to you. You also have to keep an eye out for “heel strike”— when your heels hit the front wheel during slow speed tight turns. Routing the long chain from the very front of the bike to the back in a way that does not interfere with the steering or the rider can lead to very complex chain management with multiple idlers and chain tubes to guide the chain. You’ll find there’s quite a variety of SWB styles where differences in wheel sizes, suspension, and drivetrain placement will dictate the ride quality and purpose of the bike (racing, touring, commuting, etc).
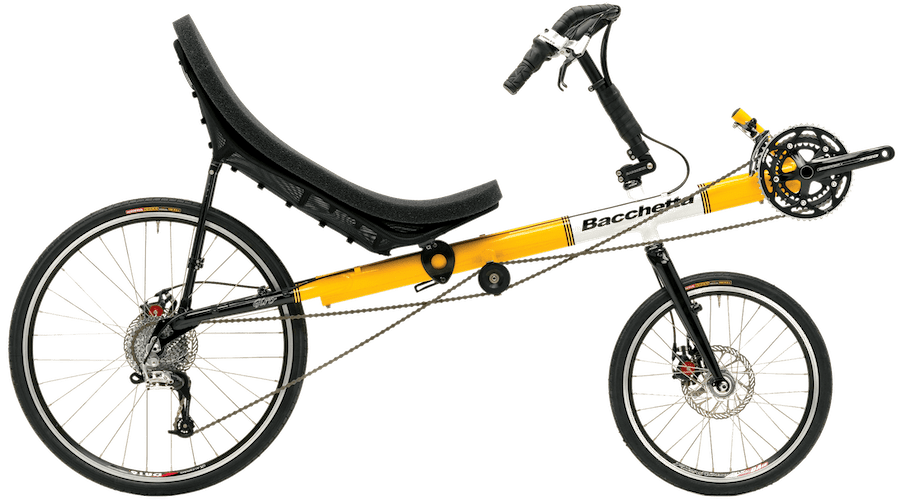
Today there are probably a couple dozen SWB brands worldwide. In the US you have Bacchetta (recently acquired by Bent Up Cycles), Cruzbike, Lightning Cycles Dynamic, Linear Recumbents, Metabike, and Schlitter. International brands with US dealers include Azub (Czech Republic), HP Velotechnik (Germany), M5 (Netherlands), Pelso (Hungary), and Performer Cycles (Taiwan). Beyond that, there are some very interesting European brands, but unfortunately they don’t have a US presence.
In my next posts, I’ll delve a bit deeper into the diverse selection of SWB bikes.
Here we have two very popular SWB bikes. Note the positions of the cranks above and in front of the front wheels defining the SWB category. Both the Bacchetta Giro (left) and HP Velotechnik Streetmachine (right) have a 26″/20″ wheel configuration, but their similarities pretty much end there. The Giro is a mono-tube rigid frame with above seat steering, and a seat that adjusts fore-and-aft to accommodate different rider leg lengths. In comparison, the Streetmachine has a more complex frame with a rear suspension swing arm, under seat steering, and it uses a telescoping boom at the front to accommodate different leg lengths.
.
.
.
.
.
* Again: not a recumbent expert, just a slightly obsessed fan. So if you are an expert reading this, please leave a comment if you spot anything incorrect or have anything to add.
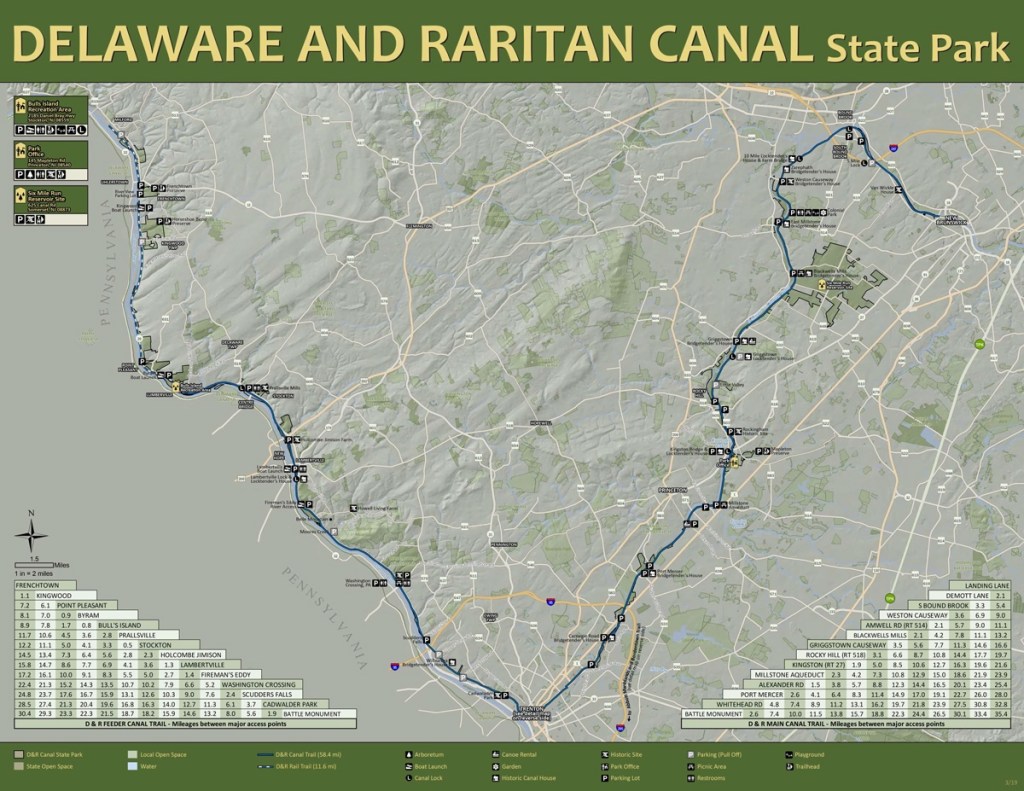
The LHT is a mix of paved and gravel trails running through Lawrence and Hopewell Townships, and offers safe, off-road access for cyclists, runners, and hikers to enjoy nature. The trail is a member of the Circuit Trails, a 750-mile network of trails connecting communities in the Greater Philadelphia Region. It is still a work in progress, but is very close to completion with just 3 miles left of the 22 mile circuit.
From Princeton we headed south along the D&R Towpath until we reached the LHT connector trail that took us to the historic Brearley House. From there we passed through Bristol Meyers Squibb and the Lawrenceville School campus, and headed into downtown Lawrenceville. We continued north through Village Park before reaching the most scenic segment of the ride through Mercer Meadows. There we visited a few more historic sites (the Pole Farm, the Hunt House) before looping back and stopping at the Gingered Peach in Lawrenceville for some tasty baked goods and coffee.
If you’re interested in doing this route yourself, note that there were a few trail segments with deep pockets of fine sand/gravel making riding a bit tricky at times. Yours truly did manage to fall over once, but thankfully I don’t have far to go from the low seated recumbent!
Yesterday a few members of the Princeton Psychology/Neuroscience cycling group (the Psyclists) convened after a long pandemic hiatus for a relaxing ride along the Delaware and Raritan (D&R) Canal.
The D&R Canal State Park consists of over 70 miles of multi-use, car-free paths along the historic canal. The route of the main towpath goes in a U-shape starting north in Milford and traveling southward along the Delaware river all the way to Trenton before curving back north passing Princeton on the way up to New Brunswick. The trail consists of crushed stone and packed dirt, and is best suited for hybrid and mountain bikes. As far as casual/recreational cycling goes, it is one of the main attractions of west/central NJ.
Yesterday’s ride took us from Princeton northward for 6 miles to the small town of Rocky Hill. There we visited Buy the Cup, a locally owned coffee shop, before reversing course and heading back. Despite the recent flooding in the area, the towpath was in surprisingly good condition and the meandering geese stayed out of our way!
The most frequent questions I get about my recumbent bike from passersby are “is it hard to ride?” and “is it comfortable?” As is often the case, the answer to both is “it depends”. Recumbent bikes vary wildly in design and that of course has an effect on learning difficulty. Generally speaking, I think how well you ride a regular diamond frame (DF) bike will predict how quickly you learn to ride a recumbent. I don’t think my daily bike (pictured in my introductory post) was particularly difficult to learn, but I’ll discuss different recumbent bike styles and their ease of use in a future post.
Similarly, if the recumbent bike you choose fits you well and is suited for the type of bike riding you do, you’ll find it very comfortable. But not unlike a DF bike, if you don’t pick the right bike you’ll probably end up dissatisfied.
In today’s post, I’ll delve a bit deeper into the comfort of a recumbent bike and other reasons why someone may want to ride one.
Comfort
If you happen to be middle-aged like yours truly, you may be intimately familiar with terms like herniated discs, spinal instability, back pain, neuropathy, etc. For me, my back pain is made worse by bending over or sitting upright for prolonged periods of time. Now picture a typical DF bike and you can see how the rider’s position could aggravate a bad back.
Most recumbents have an adjustable seat that can be set to varying degrees of uprightness. These seats are large and allow you to sit in them instead of perching on top of a standard bike saddle. Generally speaking, recreational and touring recumbents will have you positioned a bit more upright allowing you to see traffic and your surroundings a bit better, while the racing ‘bents will let you get very horizontal to give you a more aerodynamic profile. I personally find being 35 degrees or less reduces pressure on my spine enough to allow me to ride completely pain free.
Beyond the back, your shoulders and neck are more relaxed, and your wrists and hands no longer have to bear your upper body weight as they would if you’re hunched over the handlebars of a DF bike. But just how relaxed your upper extremities are depends a lot on the type of steering and handlebars on the bike because not all recumbents steer alike (note to self: future blog post topic).
The Rans Stratus (left) and the Schlitter Encore (right) are obviously two very different bikes. The Status is a touring recumbent with an upright seating position and a low bottom bracket, while the Encore is a “high-racer” bike with a very reclined position and high bottom bracket for increased power output.
Speed
There’s a whole other group of cyclists that gravitate toward recumbent bikes because they want to go as fast as possible. While a recumbent bike may be faster on flats and downhill compared to a DF bike, it all depends on many factors like what kinds of bikes you’re comparing and what “motor” you have powering them.
Recumbent riders interested in speed will often enhance their aerodynamic profile by adding a windscreen (or fairing) to the front and/or a tail sock to the back. For example, just take a look at the classic Lightning F40 recumbent with a full body fairing in this video. It may look absolutely ridiculous, but this thing really flies.
For those really interested in speed, they’ll go for a recumbent bike (or trike) incased in a rigid streamlined shell. These are known as velomobiles, and they are the kinds of bikes that set human powered vehicle (HPV) land speed records (currently at 89.58 mph). The amazing thing about velomobiles is you don’t need to be very strong or exert much effort to reach some fast cruising speeds. That makes them quite suitable for people who have long commutes on relatively flat terrain.
I should note that in my experience recumbents tend to be slower when going uphill compared to DF bikes. Unlike a DF bike, on a recumbent bike you can’t stand up out of your seat, mash your pedals down with the help of your weight, and rock your bike back and forth to get up a steep incline. All you can do is sit back and keep spinning those legs. I am overgeneralizing a bit though, and experts will tell you about recumbent bikes that are just as fast or faster uphill than DF bikes (the Cruzbike Vendetta V20 is a well known example).
Safety
Would you rather be careening down a street avoiding potholes and car doors while on a regular DF bike or on a recumbent? Turns out you’ll be safer on a recumbent. Research has shown more severe injuries occur on a DF bike compared to a recumbent bike. On a recumbent, your center of gravity is much lower and you’re traveling feet first. You’re certainly better off crashing with your feet than your head! Plus you can brake much harder without the prospect of flipping over your handlebars and suffering a severe head injury.
Also while you’re on a recumbent, your head is more upright allowing you to spot road hazards and make eye contact with drivers more easily. Not to mention the fact that you’re riding something weird, so drivers will notice you much more readily.
When talking about safety, I have to at least mention the recumbent trike. You can’t fall over on a trike (unless you really push it to its limits on a high speed turn and flip it). So for riders of a certain age, or those with balance problems, or those who exceed the weight limits of a two-wheeled bike, the trike is a very safe option. Many young recumbent bike riders of the 80s and 90s have since graduated to trikes in the past 15 yrs for this reason, leading to tremendous growth in the trike market (and a parallel shrinking of the recumbent bike market).
Style
This is just my opinion of course, but I do think there’s something inherently cool about recumbent bikes. It’s really interesting to see the variety of styles and solutions builders have come up with. In comparison, now most regular DF bikes just look plain boring to me!